What’s an access profile?
Everyone in your organization needs access to the software your whole team uses to stay in touch and get work done. But an employee in the Accounting department probably doesn’t need access to the specialized tools the Product Design team uses, or vice versa. For both simplicity and security, limit the list of resources each employee at your company can request by creating access profiles. Access profiles are groups of resources and entitlements. You determine the contents of each profile and who the profile is visible to. You’ll likely want to create two types of access profiles:- An access profile with the tools and access used by everyone in your company, which is visible to everyone
- Access profiles scoped to certain departments, job types, or access levels, which are only visible to the folks in those groups
Create a new access profile
Assign an owner to the access profile. Click the pencil icon next to Owners: at the top of the page and select one or more owners.Because an access profile is a resource within the C1 application, naming an owner or owners makes it possible to set up review, request, and revoke policies that assign these tasks to the owner of the access profile resource.
Add apps and entitlements to the profile. On the Apps tab, click Manage, then select the apps you want to include in the profile (step 1) and the entitlements within each app (step 2).
Tips for adding entitlements to access profiles:1. Make sure you’re adding the right access entitlements. If you have applications that are sourced through your identity provider (IdP), be sure to add the access entitlement for the app itself, and not the access entitlement for the app via IdP, which only grants the ability to SSO into the app.Here’s an example: When Docusign is sourced through Okta, you’ll see two Docusign access credentials. To add Docusign access to your access profile, choose the Docusign credential entitlement, not the Okta app entitlement.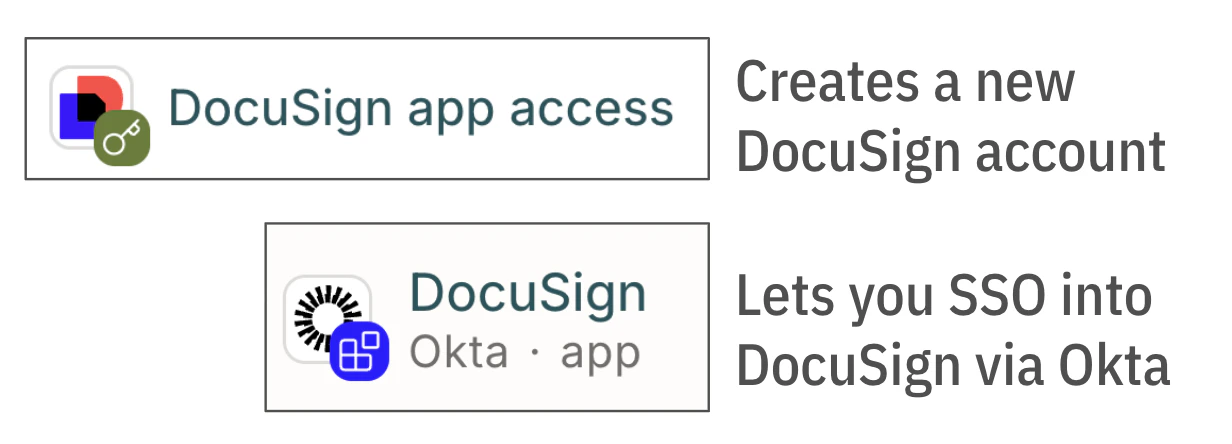
When you’ve selected the entitlements you want to add to the access profile (don’t worry, you can always adjust this list later), click Save.
Set who can view and request items from this access profile. On the Controls tab, in the Self-service requests area of the screen, click Edit.
Click to turn on Published. This makes the access profile’s contents available to the selected requesters. You can leave this toggle disabled until you’re ready to launch the access profile.
Under Visible to, set whether this access profile can be viewed and requested by everyone in your organization, or just users who are currently granted specific entitlements.If you choose the Users who have option, use the dropdown to find and add the entitlements. Only users who are currently assigned the entitlements you choose can view and request this access profile’s contents.
Use the Allow enrollment requests toggle to set whether employees can request the entire access profile with a single request.C1 will automatically create individual request tickets for each entitlement in the access profile not yet granted to the employee.
Use role mining recommendations
Role mining analyzes access patterns across your organization to suggest entitlements for access profiles. C1 assigns a confidence score to each entitlement suggestion:- 80% or higher — This entitlement is a great fit for this access profile
- 50%–79% — This entitlement might be a good fit for this access profile
- 49% or lower — This entitlement likely isn’t a good fit for this access profile
Add an entitlement to an existing access profile
There are two ways to add an entitlement to an access profile.Manage entitlements from the access profile’s Apps tab
On the Apps tab of an access profile’s details page, entitlements are organized by app. You have two options:- To add a new app (and select its entitlements): Click Manage. Select the apps you want to add (step 1), then select the specific entitlements within those apps (step 2), and click Save changes.
- To change which entitlements from an existing app are in the profile: Click the pencil icon next to the app. Check or uncheck entitlements in the drawer, then click Save changes.
Add an entitlement on the entitlement’s details page
Alternatively, you can add an entitlement to an existing access profile from the entitlement’s own details page. This method is ideal for times when you want to add a single entitlement to multiple access profiles.On the Managed apps tab, navigate to the entitlement you want to add to an access profile:
- Click the application’s name
- Click the Entitlements tab
- Locate the entitlement you want and click its name
In the Access profiles field, search for and select one or more access profiles you want to add the entitlement to.
Update a current access profile holder’s grant
If profile requests are allowed, any newly added entitlement will be included in future grants of the full access profile, but the entitlement will not be automatically granted retroactively to users who were previously granted the access profile. To manually add the new entitlement to a current profile holder’s access:Locate the newly added entitlement in the list of entitlements included in the access profile and click the … (more actions) menu.
Any users who have been granted the full access profile but do not currently have access to the entitlement display Not granted in the Status column. Click Request for the users who you want to receive access to the new entitlement.You can also click Request for all to request access for all profile holders who do not have the entitlement.
Grant duration and expiration in access profiles
Access profiles control how long a user can be enrolled, but they don’t control how long the underlying grants last. When a user enrolls in a profile, C1 creates individual grants for each entitlement in the profile — and each grant follows the duration configured on that entitlement, not the profile’s enrollment duration. If different entitlements in the same profile have different durations configured, their grants will expire at different times, independently of each other and independently of when the enrollment itself expires. What happens to those grants when a profile enrollment ends depends on the profile’s When enrollment expires setting. Depending on how this is configured, grants may be left in place, revoked, or revoked unless the user has another active enrollment justifying them.Profile expiration settings
Access profiles have two settings that control enrollment duration and what happens when it ends:- Maximum enrollment duration — the longest enrollment period a user can request. If a user requests a duration longer than the maximum, it’s capped. If they don’t specify a duration, the maximum is used as the default.
- When enrollment expires — what C1 does to a user’s entitlement grants when their profile enrollment period ends. There are three options:
- Leave as-is — grants are not touched when enrollment expires. Access continues until grants expire on their own schedule or are revoked manually.
- Revoke all — all grants created by this enrollment are revoked when enrollment expires, regardless of any other access the user holds.
- Revoke if unjustified — grants are revoked when enrollment expires, unless the user is still enrolled in another active profile that includes the same entitlement. A direct grant to the same entitlement does not count as justification.
When a user has both a profile enrollment and a direct grant
A user may hold the same entitlement from two sources at once: a profile enrollment and a direct grant. In that case, both the individual grant durations and the profile’s When enrollment expires setting affect what happens to access over time.| When does access end? | When enrollment expires setting | What happens |
|---|---|---|
| The direct grant expires before the profile enrollment | Any | Access is revoked when the direct grant expires, even though the enrollment is still active |
| The profile enrollment expires; the direct grant is still active | Leave as-is | Access continues. The direct grant remains active. |
| The profile enrollment expires; the direct grant is still active | Revoke all | Access is revoked, regardless of the direct grant |
| The profile enrollment expires; the direct grant is still active | Revoke if unjustified | Access is revoked. A direct grant does not count as justification. |