> ## Documentation Index
> Fetch the complete documentation index at: https://www.c1.ai/docs/llms.txt
> Use this file to discover all available pages before exploring further.
# Managing entitlements
> Entitlements are access rights, permissions, or privileges on resources.
## What are entitlements?
Entitlements are access rights, permissions, or privileges to resources in an application.
For example, entitlements can include:
* **Membership** to a group
* **Read** access to a data table
* **Assignment** of a role
Entitlements allow C1 to provide fine-grained visibility into access rights and privileges for users and accounts.
When application data is ingested into C1 via connector, file, or other data feed, C1 identifies and creates [resources](/product/admin/managing-resources) and entitlements for those resources in the application. These resources are the basis of permission management.
To navigate to the entitlements in an application, go to the application's page and click the **Entitlements** tab.
### A special entitlement: Access
Every managed application in C1 comes with a built-in resource and entitlement: the **Credential** resource and the **Access** entitlement. The Access entitlement references all [accounts](/product/admin/managing-accounts) in the application, which lets C1 treat account membership like any other entitlement.
For example:
* If you want to make new accounts requestable in C1, set the corresponding access controls on the **Access** entitlement.
* If you want to run an access review on anyone who has any account in an application, select the **Credential** for the application.
Because of its special nature, the Access entitlement cannot be renamed or deleted. However, you can set its attributes and manage its grants just like any other entitlement.
## Creating entitlements
Entitlements are created automatically when connector or file data is ingested into C1. Connectors identify resources inside the application — roles, groups, and similar objects — and sync them along with their corresponding entitlements to C1.
If you need to manually create an entitlement for a resource, you can create a virtual entitlement:
On the app's **Entitlements** tab, click **Create virtual entitlement**.
Select the **Resource type**, enter a name, and optionally add a description.
Click **Create**.
## Customize columns and export to CSV
Use **Configure columns** in the **Entitlements** table header to adjust which columns are visible — toggle columns on or off and drag to reorder. Your layout is saved automatically.
To export entitlements data to CSV, click **Generate CSV** above the **Entitlements** table. The **Download to CSV** drawer opens where you can choose which columns to include before generating the file.
## Managing entitlements
To manage an entitlement, navigate to the application, click the **Entitlements** tab, and click on the entitlement to open its detail page. From there, you can:
### Rename the entitlement
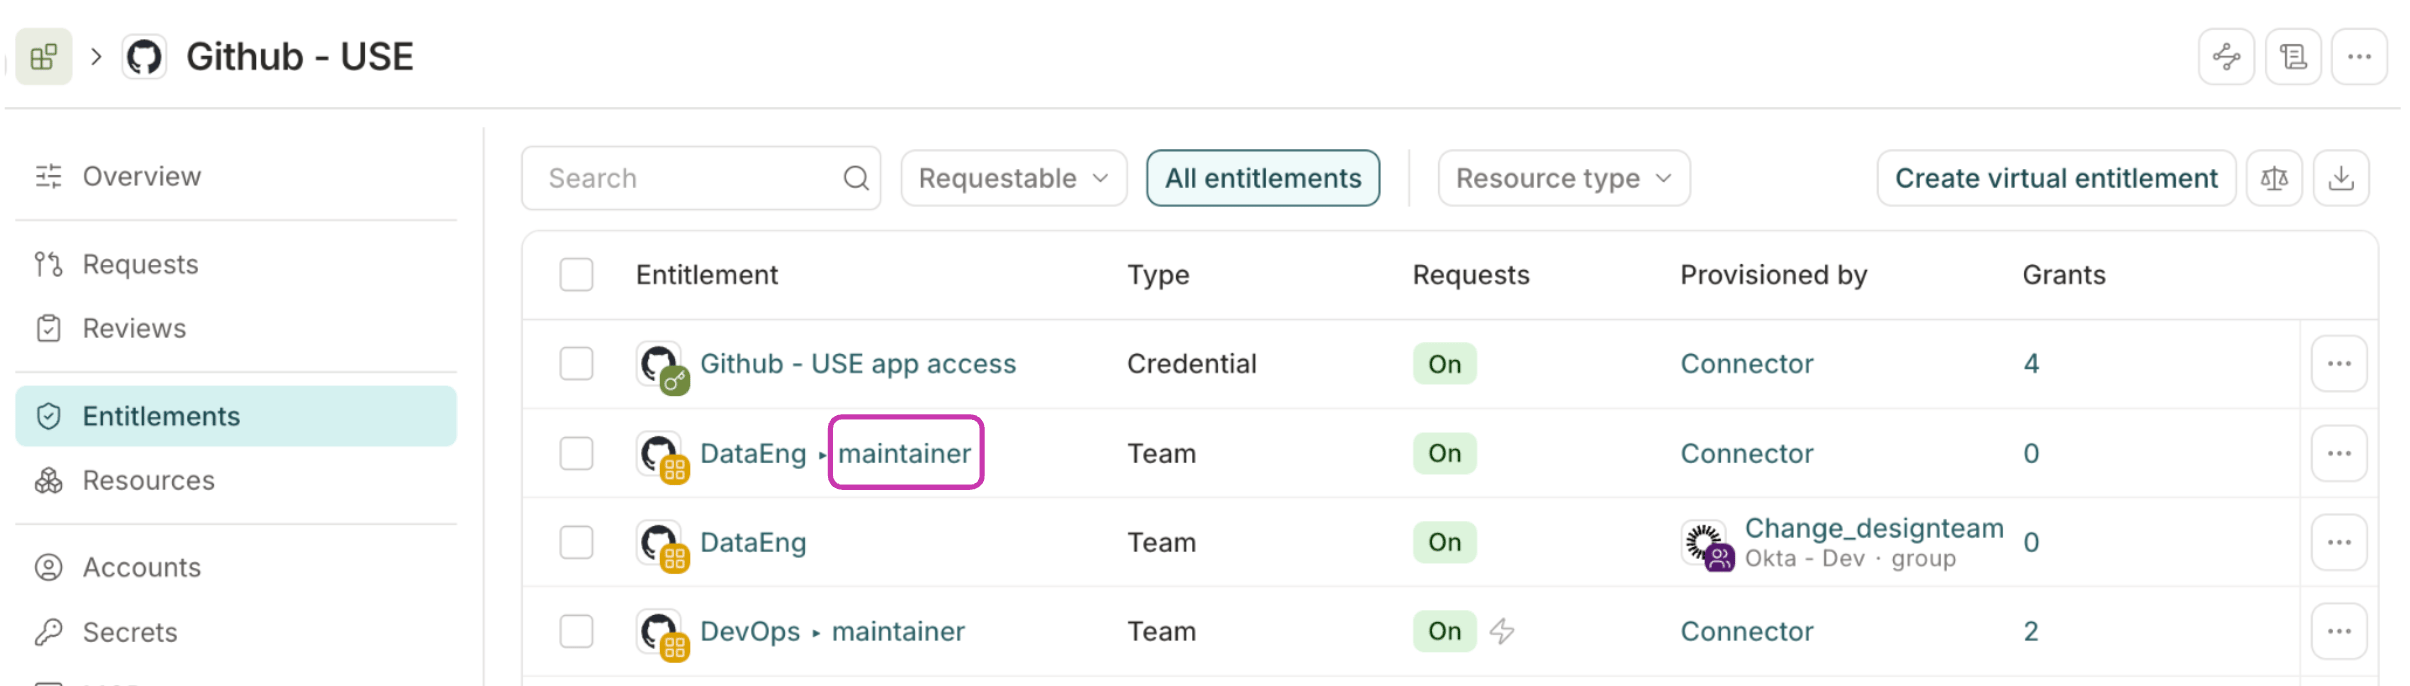
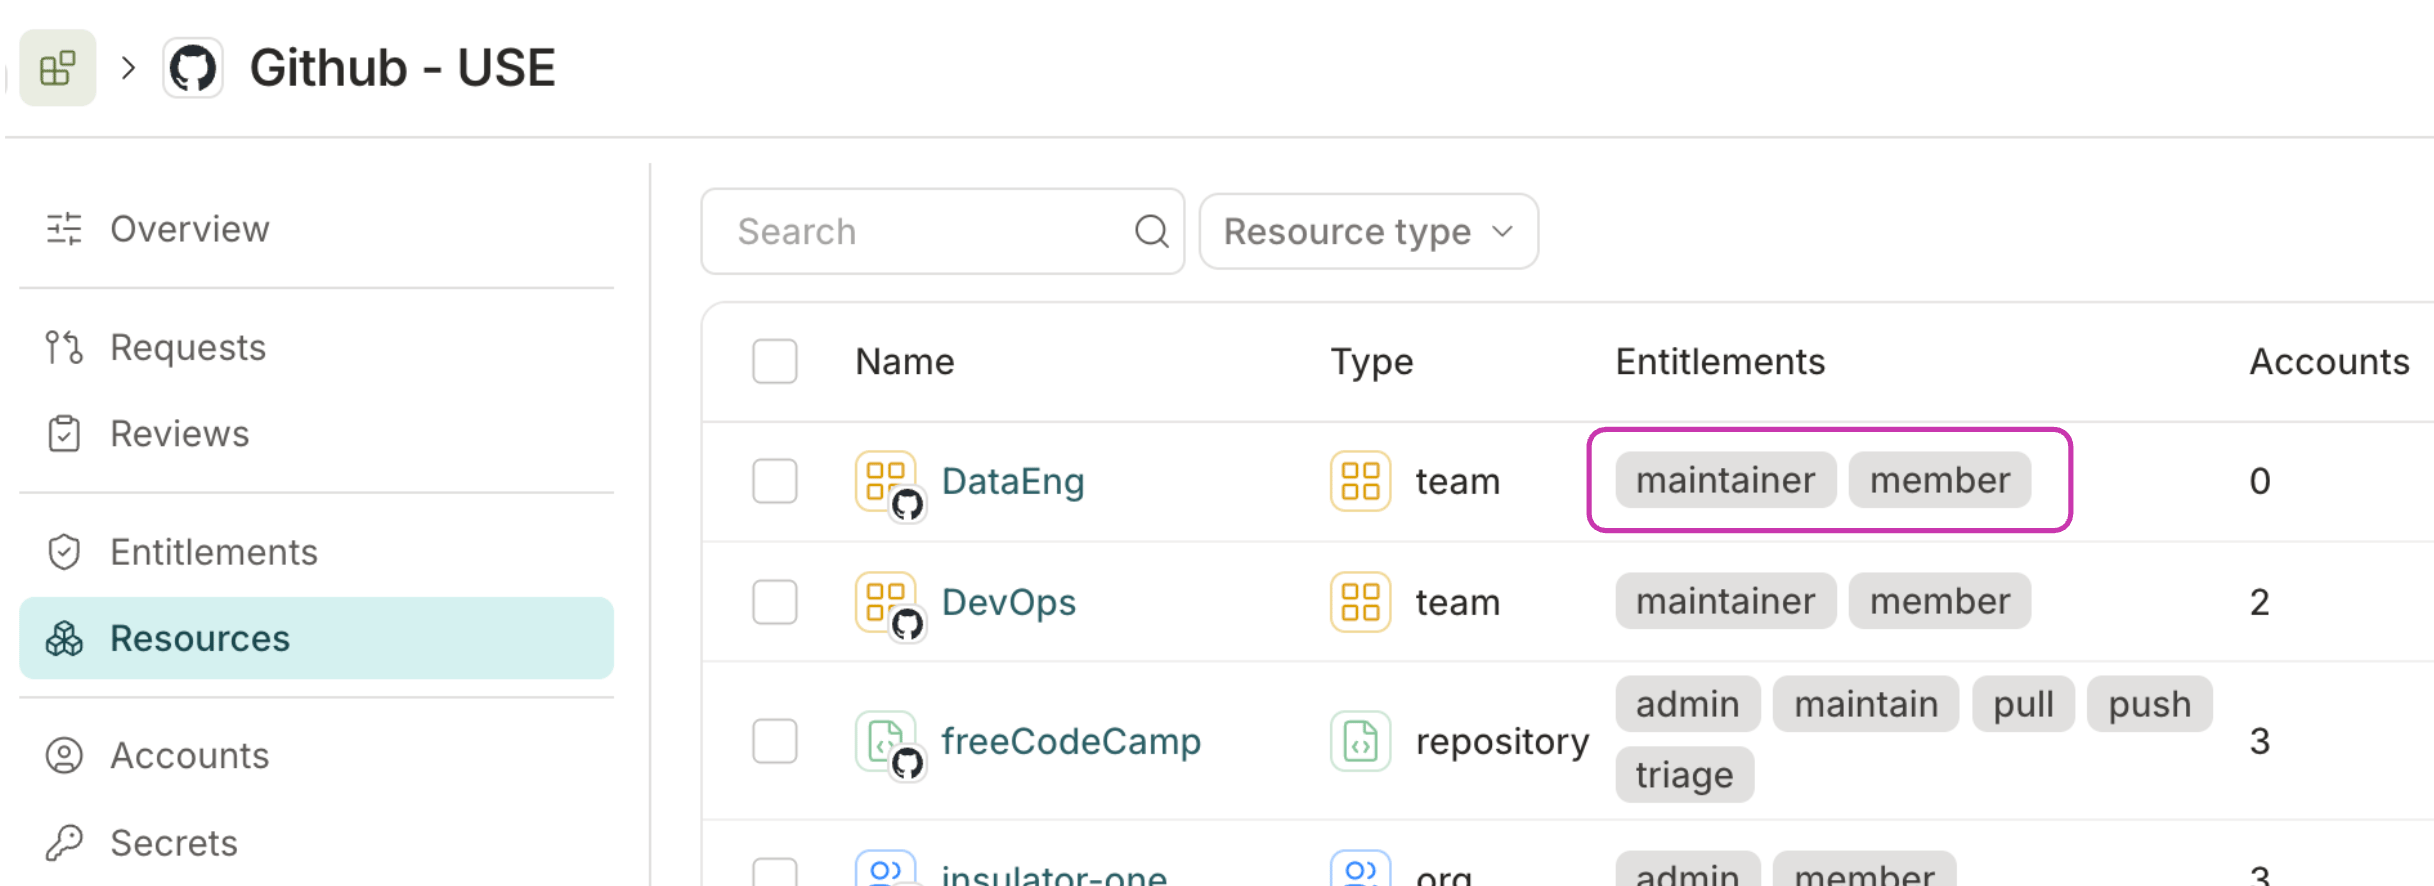
In C1, entitlements are displayed next to their resource as a short label called a *slug*. The slug describes the access right or permission the entitlement grants.
Entitlement slugs are set automatically by connectors, but you can edit most of them. The exception is the credential resource, which has a single **Access** entitlement that cannot be renamed.
Entitlement slugs appear on individual entitlement summaries:
 They are also used to show all the entitlements on a particular resource:
 To edit the entitlement slug:
Navigate to the entitlement's **Details** tab and click **Edit**.
Edit the **Slug** field to change the entitlement's slug.
Click **Save**.
### Manage entitlement owners
Entitlement owners can be the target of policy approval steps — for example, you can require an entitlement owner to approve access requests for sensitive data or roles.
You can assign entitlement owners in two ways:
* **By user**: Add specific C1 users as direct owners.
* **By entitlement**: Add any entitlement from a connected app. All users currently assigned that entitlement automatically become owners, and ownership updates as users are granted or removed from the entitlement.
You can add up to 32 direct user owners and up to 32 entitlements as owners on each entitlement.
To edit an entitlement's owners:
On the entitlement's **Details** page, click the pencil icon next to **Owner**.
In the **Select owners** window, use the **Users** tab to add or remove user owners, or the **Entitlements** tab to search for and add entitlement owners.
You can mix and match user and entitlement owners as needed.
Click **Save**.
**Done.** The entitlement's ownership updates immediately.
### Add annotations to the entitlement
At the top of the entitlement's **Details** page you'll find an **Annotations** field, where you can attach custom key/value metadata to the app — useful for tracking cost centers, compliance scope, or IaC management state. [Learn more about annotations.](/product/admin/object-annotations)
### Set entitlement attributes
You can create custom risk levels and compliance framework tags, and apply these tags to entitlements. You can then sort and select entitlements for access reviews and access profiles by compliance framework or risk level.
To create attributes:
Navigate to **Settings** > **Tags**.
Click **Edit** on the **Attribute values** section of the page.
In either the **Compliance framework** or **Risk level** field, type the name of the value you wish to add and press Enter.
Repeat the process, adding additional attribute values as needed. Click the **x** next to any value to remove it from the list.
When you're finished, click **Save** and confirm your action.
If you remove an attribute that is currently in use in C1, that attribute will not be removed from any entitlements it is assigned to.
To apply an attribute to an entitlement:
Click **Edit** in the attributes box
Select the correct risk level for the entitlement, or select **None**.
If applicable, select any compliance frameworks that apply to the entitlement.
Click **Save**.
You can now filter entitlements by attribute when creating an access review campaign or access profile.
### Set an entitlement alias
Aliases are shortcuts you can add to entitlements. They let you reference an entitlement by a short, memorable name — for example, when using the [C1 CLI tool](/product/cli/commands) to request access.
For example, in the command `cone get aws-prod`, `aws-prod` is the alias mapped to a production AWS role.
To set an alias on an entitlement:
Click **Edit** in the attributes box
Locate the **Alias** field and enter your chosen alias for the entitlement.
Click **Save**.
## View and manage entitlement grants
Grants are a list of who currently is granted an entitlement on a resource. To see the grants for the entitlement, click **Grants**.
Grants can be managed directly from this page. You can revoke a specific grant by clicking **Revoke**.
You can also change, extend, or even remove a grant's expiration date on this page. Select a grant or multiple grants by clicking the checkbox on the left, then select **Set expiration** or **Remove expiration** from the bulk actions menu.
## Entitlement visibility
Entitlement visibility is inherited from the resource the entitlement belongs to. When a resource's visibility is restricted, all entitlements on that resource are also restricted in the same way.
For example, if a resource's visibility is set to **Members**, only users who have been granted an entitlement on that resource (along with the resource's owners, entitlement owners, the app's owners, and Super Admins) can see the resource and any of its entitlements. Users who don't meet the visibility criteria will not see the entitlements in search results or other areas of the C1 interface.
To change the visibility of an entitlement, update the [visibility setting on its parent resource](/product/admin/managing-resources#resource-visibility-controls).
Entitlement visibility cannot be set independently of its resource. All entitlements on a resource share the same visibility setting.
**Access profiles take priority over visibility settings.** If a user is included in an [access profile](/product/admin/profiles) that grants or allows requests to an entitlement, that user will still be able to see and request the entitlement in the access catalog, even if the parent resource's visibility would otherwise hide it.
## Deleting entitlements
To delete an entitlement:
On the entitlement's detail page, click **...** in the top right corner and select **Delete**.
In the confirmation dialog, confirm that you want to delete the entitlement.
Entitlements (and resources) synced from a connector cannot be deleted. These entitlements represent the "truth" of the application that is connected. To delete these entitlements, they must be deleted in the connected app.
To edit the entitlement slug:
Navigate to the entitlement's **Details** tab and click **Edit**.
Edit the **Slug** field to change the entitlement's slug.
Click **Save**.
### Manage entitlement owners
Entitlement owners can be the target of policy approval steps — for example, you can require an entitlement owner to approve access requests for sensitive data or roles.
You can assign entitlement owners in two ways:
* **By user**: Add specific C1 users as direct owners.
* **By entitlement**: Add any entitlement from a connected app. All users currently assigned that entitlement automatically become owners, and ownership updates as users are granted or removed from the entitlement.
You can add up to 32 direct user owners and up to 32 entitlements as owners on each entitlement.
To edit an entitlement's owners:
On the entitlement's **Details** page, click the pencil icon next to **Owner**.
In the **Select owners** window, use the **Users** tab to add or remove user owners, or the **Entitlements** tab to search for and add entitlement owners.
You can mix and match user and entitlement owners as needed.
Click **Save**.
**Done.** The entitlement's ownership updates immediately.
### Add annotations to the entitlement
At the top of the entitlement's **Details** page you'll find an **Annotations** field, where you can attach custom key/value metadata to the app — useful for tracking cost centers, compliance scope, or IaC management state. [Learn more about annotations.](/product/admin/object-annotations)
### Set entitlement attributes
You can create custom risk levels and compliance framework tags, and apply these tags to entitlements. You can then sort and select entitlements for access reviews and access profiles by compliance framework or risk level.
To create attributes:
Navigate to **Settings** > **Tags**.
Click **Edit** on the **Attribute values** section of the page.
In either the **Compliance framework** or **Risk level** field, type the name of the value you wish to add and press Enter.
Repeat the process, adding additional attribute values as needed. Click the **x** next to any value to remove it from the list.
When you're finished, click **Save** and confirm your action.
If you remove an attribute that is currently in use in C1, that attribute will not be removed from any entitlements it is assigned to.
To apply an attribute to an entitlement:
Click **Edit** in the attributes box
Select the correct risk level for the entitlement, or select **None**.
If applicable, select any compliance frameworks that apply to the entitlement.
Click **Save**.
You can now filter entitlements by attribute when creating an access review campaign or access profile.
### Set an entitlement alias
Aliases are shortcuts you can add to entitlements. They let you reference an entitlement by a short, memorable name — for example, when using the [C1 CLI tool](/product/cli/commands) to request access.
For example, in the command `cone get aws-prod`, `aws-prod` is the alias mapped to a production AWS role.
To set an alias on an entitlement:
Click **Edit** in the attributes box
Locate the **Alias** field and enter your chosen alias for the entitlement.
Click **Save**.
## View and manage entitlement grants
Grants are a list of who currently is granted an entitlement on a resource. To see the grants for the entitlement, click **Grants**.
Grants can be managed directly from this page. You can revoke a specific grant by clicking **Revoke**.
You can also change, extend, or even remove a grant's expiration date on this page. Select a grant or multiple grants by clicking the checkbox on the left, then select **Set expiration** or **Remove expiration** from the bulk actions menu.
## Entitlement visibility
Entitlement visibility is inherited from the resource the entitlement belongs to. When a resource's visibility is restricted, all entitlements on that resource are also restricted in the same way.
For example, if a resource's visibility is set to **Members**, only users who have been granted an entitlement on that resource (along with the resource's owners, entitlement owners, the app's owners, and Super Admins) can see the resource and any of its entitlements. Users who don't meet the visibility criteria will not see the entitlements in search results or other areas of the C1 interface.
To change the visibility of an entitlement, update the [visibility setting on its parent resource](/product/admin/managing-resources#resource-visibility-controls).
Entitlement visibility cannot be set independently of its resource. All entitlements on a resource share the same visibility setting.
**Access profiles take priority over visibility settings.** If a user is included in an [access profile](/product/admin/profiles) that grants or allows requests to an entitlement, that user will still be able to see and request the entitlement in the access catalog, even if the parent resource's visibility would otherwise hide it.
## Deleting entitlements
To delete an entitlement:
On the entitlement's detail page, click **...** in the top right corner and select **Delete**.
In the confirmation dialog, confirm that you want to delete the entitlement.
Entitlements (and resources) synced from a connector cannot be deleted. These entitlements represent the "truth" of the application that is connected. To delete these entitlements, they must be deleted in the connected app.