> ## Documentation Index
> Fetch the complete documentation index at: https://www.c1.ai/docs/llms.txt
> Use this file to discover all available pages before exploring further.
# Global settings
> Configure global settings such as attribute values, the length of C1 sessions, and trusted IPs.
These tasks all require the **Super Administrator** role in C1.
## Set attribute values
Create custom risk level and compliance framework tags (called *attribute values*), and apply these values to entitlements. You can then sort and select entitlements for access reviews and access profiles by compliance framework or risk level.
### Step 1: Set your attribute values
Navigate to **Settings** > **Tags**.
In the **Attribute values** section of the page, click **Edit**.
In either the **Compliance framework** or **Risk level** field, type the name of the value you wish to add and press Enter.
Repeat the process, adding additional attribute values as needed. Click the **x** next to any value to delete it from the list.
If you delete a value that is currently in use in C1, that value will not be removed from any entitlements it is assigned to.
When you're finished, click **Save** and confirm your action.
### Step 2: Add attributes to an app's entitlements
You can set attributes on individual entitlements or in bulk.
#### Set attributes in bulk
Navigate to the **Apps** page.
On the **Managed apps** tab, select an application and click **Entitlements**.
Use the checkboxes to select one or more entitlements. From the bulk actions menu at the bottom of the screen, select **Set attributes**.
As applicable, select the correct risk level and compliance frameworks for the selected entitlements.
Click **Submit**.
#### Set attributes on a single entitlement
Navigate to the entitlement's details page.
On the **Details** tab, in the **Attributes** area of the page, click **Edit** and make changes as needed.
Click **Save**.
**Done.** You can now filter entitlements by attribute when creating an access review campaign or access profile.
## Set trusted domains
If needed, you can set a list of domains trusted by your organization. Any accounts associated with a domain not on the trusted domain list will be marked **External** in C1.
Navigate to **Settings** > **Organization**.
In the **Domains** area of the page, click **Edit**.
Add a trusted domain (such as `example.com`) and press **Enter**. Repeat this process as needed.
Subdomains are automatically included, so you don't need to create separate entries for `hr.example.com`, `sales.example.com`, and `design.example.com`.
Click **Save**.
**Done.** Accounts associated with a domain not explicitly marked as trusted will be tagged **External** when the connectors complete their next sync or when you refresh account data uploaded to C1 in a spreadsheet or CSV file.
## Configure session length
By default, C1 sessions are set to **20 hours**. Customize your organization's session length to adhere to your internal security policies and best practices.
Navigate to **Settings** > **SSO & sessions**.
In the **Session configuration** area of the page, click **Edit**.
Select the new maximum session length from the dropdown. Options range from 45 minutes to 20 hours.
Click **Save**.
**Done.** Your session length has been updated. C1 will require all users in your organization to start new sessions every time the maximum length you selected elapses.
## Configure global IP allow lists
To enhance security and ensure that C1 is only accessed over trusted networks, configure the global IP allow list. You can fine-tune the allowed IP ranges by category to adhere to your organization's best practices for network and API key security.
Navigate to **Settings** > **SSO & sessions**.
In the **Global IP allow list configuration** area of the page, click **Edit**.
Enable the toggles for each allow list you want to configure:
* SSO sessions for all users
* SSO sessions for users with the Super Administrator user role
* API keys for all users
* API keys with Super Administrator-level user permissions
* API keys used for configuring connectors
All allow lists are opt-in: any category that is not enabled will not place any limits on IP addresses.
For each category you've enabled, enter the allowed IP ranges (CIDRs). Up to 32 CIDRs are accepted.
As a safeguard against locking yourself out of the system, C1 displays a banner showing whether your current IP address is allowed or denied access.
**If you accidentally lock yourself out, contact the C1 support team.**
When you've finished adding allowed IP ranges, click **Save**. Changes may take up to 60 seconds to take effect.
### Frequently asked questions about global IP allow lists
**What happens if I save an empty allow list?**
Saving an empty allow list means "no IP addresses are allowed", which effectively blocks all access. This can be used strategically: for example, you could disable the ability to create API keys with Super Administrator-level user permissions by saving an empty allow list for this category.
**Can I block a specific IP range?**
No, only explicit allow lists are supported. If the IP range is not included in an allow list, it is effectively banned.
**If an allow list is configured for both SSO sessions and API keys, which is evaluated first?**
API keys that have a source IP allow list are evaluated first, followed by other types of access.
## Temporarily disable system features
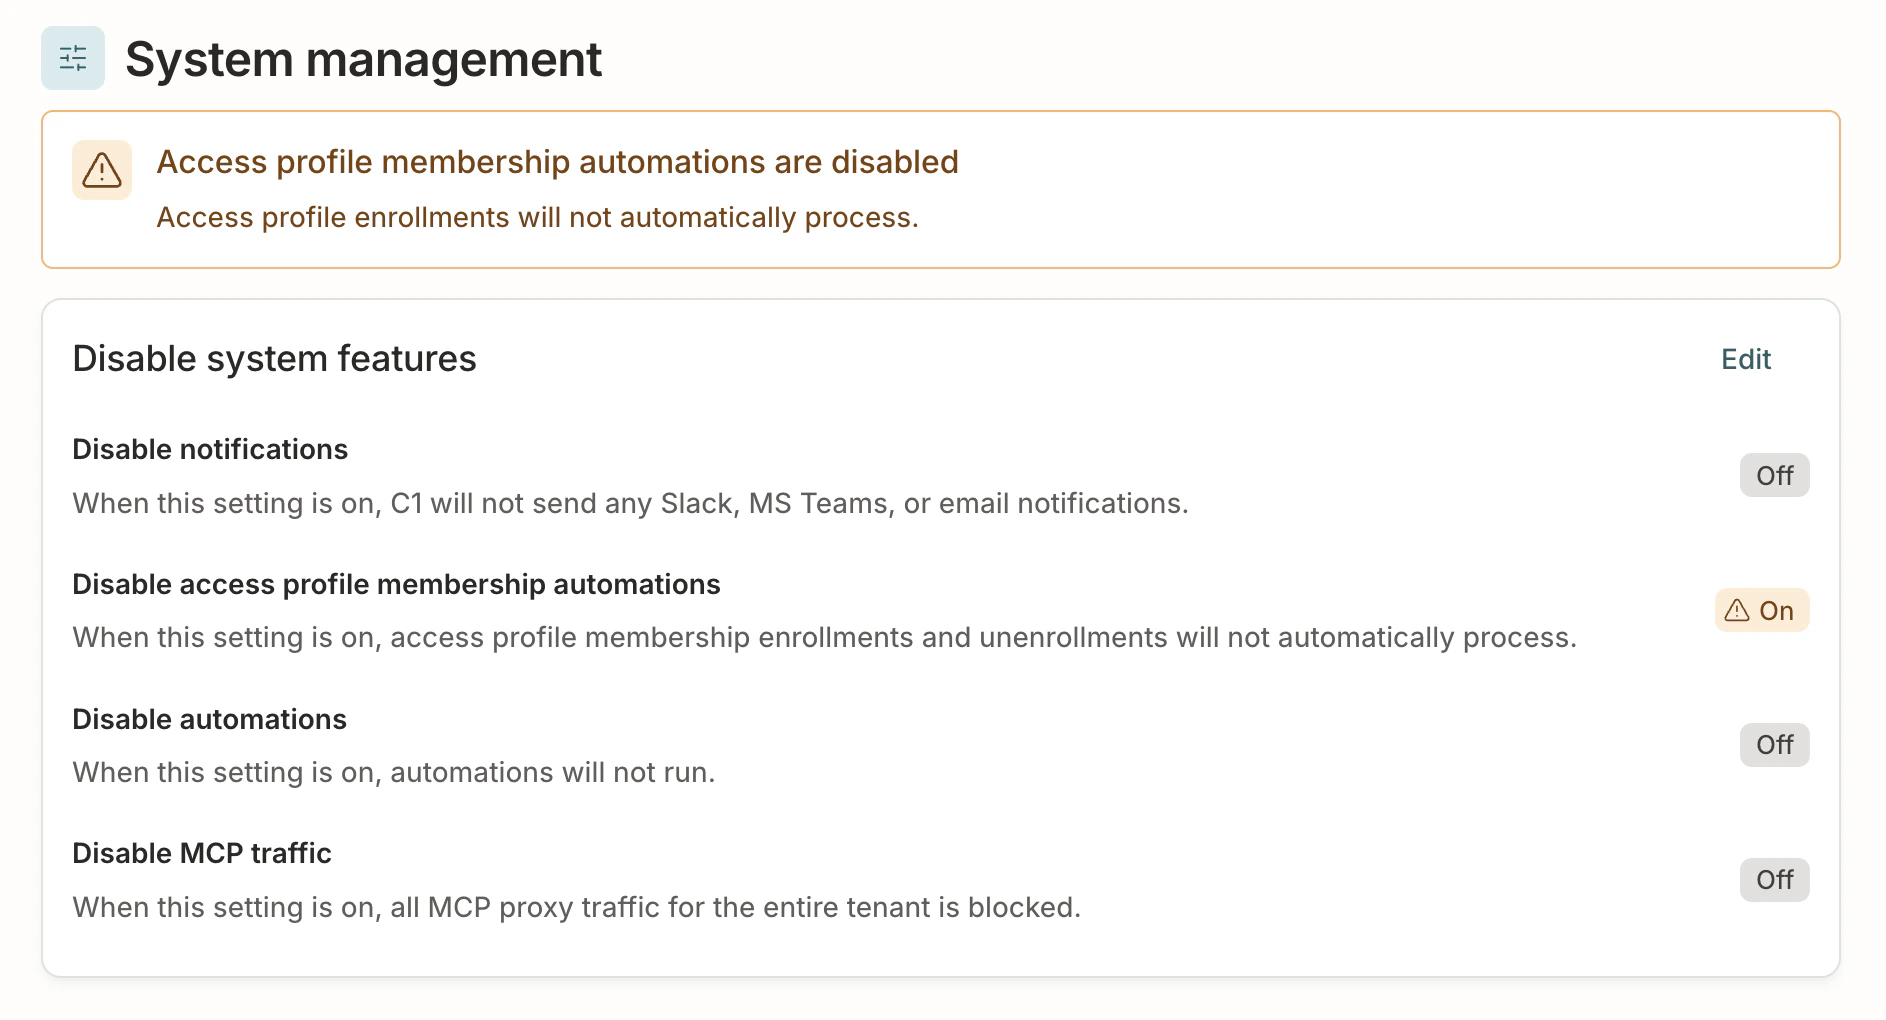
The controls on the **System management** page allow you to temporarily disable automations and all notifications with a single click. Using these controls helps C1 admins to perform system maintenance, large-scale data changes, and crisis management without generating an overwhelming number of alerts or triggering unintended access changes.
Navigate to **Settings** > **System management**.
Click **Edit** and enable one or more of the available options:
* **Disable notifications**: No Slack or email notifications are sent. Emails and Slack notifications are not queued for sending, and notifications accumulated while notifications are disabled will **not** be sent once notifications are re-enabled. Notifications that would have been sent will be logged.
* **Disable access profile membership automations**: Automated membership enrollments for access profiles are not processed. A log will be generated each time the membership automation attempts a sync.
* **Disable automations**: Automation executions are not processed. Executions are created, but will terminate immediately. A log will be generated each time an automation attempts to execute.
Click **Save**.
If any system management control is enabled, a banner is shown across C1 alerting other users that normal operations of that function have been temporarily suspended.