> ## Documentation Index
> Fetch the complete documentation index at: https://www.c1.ai/docs/llms.txt
> Use this file to discover all available pages before exploring further.
# Manage external data sources
> Leverage external data sources in S3 or Azure Blob Storage for ingesting app data or pushing SIEM logs
## What are external data sources?
External data sources are S3 buckets, Azure Blob containers, and other file systems that C1 has the permissions to read and write. External data sources can be used for:
* Pushing audit logs for offline storage
* Pushing audit logs for consumption into your SIEM
* Ingesting application data
## Set up an S3 data source
This task requires the **Super Administrator** role in C1 and the **ability to create an IAM Role** in AWS.
C1 uses an IAM Trust relationship between your AWS Account and C1's Service AWS Account for integrating to S3. This is the [AWS-recommended method of sharing access to AWS Accounts](https://docs.aws.amazon.com/IAM/latest/UserGuide/id_roles_common-scenarios_third-party.html). C1 has a specially created and isolated AWS Account dedicated to the AWS integration.
### Step 1: Get a C1-provided External ID for the AWS IAM Role
Log into C1.
Navigate to **Integrations** > **External data sources**.
Click **Add data source**.
Choose who will own and manage this integration, then click **Create and add details**.
The S3 bucket integration form opens. Copy and save the External ID generated for you by C1. You'll use this value in Step 2.
### Step 2: Create an AWS IAM Role for C1
In a new browser tab, navigate to AWS and sign into your AWS account.
Navigate to the **Identity and Access Management (IAM)** dashboard.
Click **Roles** > **Create Role**.
Select **Custom Trust Policy** and paste the following code into the Trust Policy JSON editor, replacing `` with the value you saved in Step 1.
```json theme={"theme":{"light":"css-variables","dark":"css-variables"}}
{
"Version": "2012-10-17",
"Statement": [
{
"Effect": "Allow",
"Principal": {
"AWS": "arn:aws:iam::765656841499:role/ConductorOneS3DatasourceService"
},
"Action": "sts:AssumeRole",
"Condition": {
"StringEquals": {
"sts:ExternalId": ""
}
}
}
]
}
```
Click **Next**.
Do not make any changes on the **Add permissions** page. Click **Next**.
On the **Name, review, and create** page, in the **Role Name** field, enter **C1Integration.**
**Optional.** Add any tags relevant to your organization.
Click **Create role**.
### Step 3: Assign policy to C1Integration AWS role
Back on the **Roles** page, click on the newly created **C1Integration** role to view the role's details.
Under **Permissions Policies**, click **Add Permissions** and select **Create Inline Policy**.
Click the **JSON Editor** tab and paste in the following code:
```json theme={"theme":{"light":"css-variables","dark":"css-variables"}}
{
"Version": "2012-10-17",
"Statement": [
{
"Effect": "Allow",
"Action": [
"s3:GetObject",
"s3:GetObjectAttributes",
"s3:ListBucket",
"s3:GetBucketLocation",
"s3:PutObject"
],
"Resource": [
"arn:aws:s3:::",
"arn:aws:s3:::/*"
]
}
]
}
```
**If you plan to only use this s3 bucket for application data syncs** and therefore need only be read only, you can safely omit `"s3:PutObject"` from the policy.
Click **Review Policy**.
In the **Name** field, enter **C1Permissions**.
Click **Create policy**.
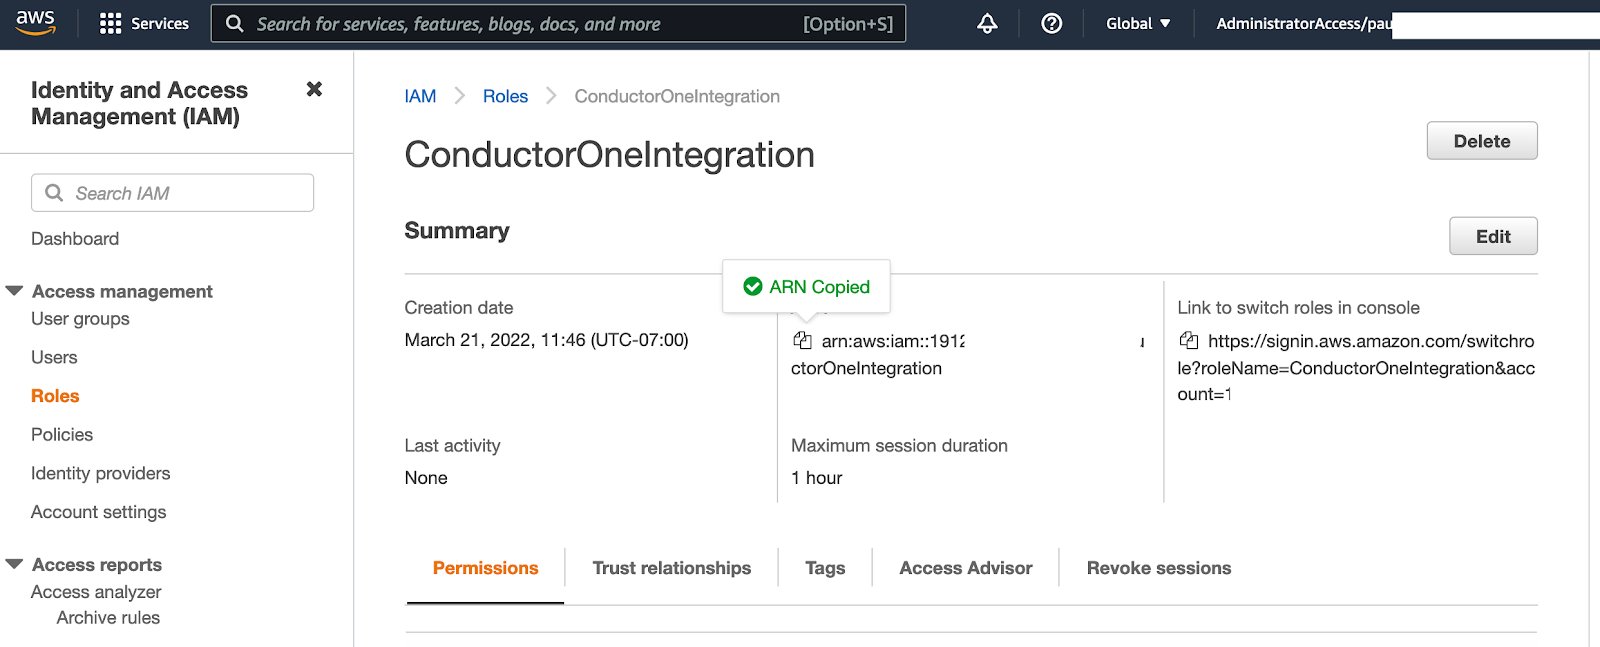
Copy and save the **Role ARN** for the newly created policy. The Role ARN is formed as `arn:aws:iam:::role/ConductorOneIntegration`. You'll use this value in Step 4.
 ### Step 4: Configure the external data source in C1
Return to the C1 **Integrations** > **External data sources** page if necessary and navigate to your newly created external data source.
Paste the Role ARN you generated in Step 2 into the **Role ARN** field.
Enter the name of the S3 bucket that contains the files you want to use in C1 in the **S3 bucket** field.
Click **Save**.
## Set up an Azure Blob Storage data source
This task requires the **Super Administrator** role in C1 and the ability to create a service principal and assign roles in Azure.
C1 authenticates to Azure Blob Storage using an Azure Active Directory (Entra ID) service principal. The service principal must have the **Storage Blob Data Contributor** role on the target container.
### Step 1: Create a service principal in Azure
In the [Azure portal](https://portal.azure.com), navigate to **Microsoft Entra ID** > **App registrations** and click **New registration**.
Give the app registration a name, such as "C1 external data source", then click **Register**.
On the app registration overview page, copy and save the **Directory (tenant) ID** and the **Application (client) ID**. You'll use these in Step 3.
Navigate to **Certificates & secrets** > **Client secrets** and click **New client secret**.
Give the secret a description and set an expiration, then click **Add**.
Copy and save the **Value** of the new client secret immediately — it won't be shown again. You'll use this in Step 3.
### Step 2: Assign the Storage Blob Data Contributor role
In the Azure portal, navigate to the storage account that contains your target blob container.
Click **Containers** and open the target container.
Click **Access Control (IAM)** > **Add role assignment**.
In the **Role** tab, select **Storage Blob Data Contributor**, then click **Next**.
In the **Members** tab, click **Select members** and search for the app registration you created in Step 1. Select it and click **Select**.
Click **Review + assign** to complete the role assignment.
### Step 3: Configure the external data source in C1
In C1, navigate to **Integrations** > **External data sources**.
Click **Add data source** and select **Azure Blob Storage** as the data source type.
Choose who will own and manage this integration, then click **Create and add details**.
Select **Azure Blob Storage** as the data source type.
Enter the **Tenant ID**, **Client ID**, and **Client secret** you saved in Step 1.
Enter the names of your **Storage account** and the blob **Container name** within the storage account.
Click **Save**.
**Done.** C1 can now read from and write to your Azure Blob container.
### Step 4: Configure the external data source in C1
Return to the C1 **Integrations** > **External data sources** page if necessary and navigate to your newly created external data source.
Paste the Role ARN you generated in Step 2 into the **Role ARN** field.
Enter the name of the S3 bucket that contains the files you want to use in C1 in the **S3 bucket** field.
Click **Save**.
## Set up an Azure Blob Storage data source
This task requires the **Super Administrator** role in C1 and the ability to create a service principal and assign roles in Azure.
C1 authenticates to Azure Blob Storage using an Azure Active Directory (Entra ID) service principal. The service principal must have the **Storage Blob Data Contributor** role on the target container.
### Step 1: Create a service principal in Azure
In the [Azure portal](https://portal.azure.com), navigate to **Microsoft Entra ID** > **App registrations** and click **New registration**.
Give the app registration a name, such as "C1 external data source", then click **Register**.
On the app registration overview page, copy and save the **Directory (tenant) ID** and the **Application (client) ID**. You'll use these in Step 3.
Navigate to **Certificates & secrets** > **Client secrets** and click **New client secret**.
Give the secret a description and set an expiration, then click **Add**.
Copy and save the **Value** of the new client secret immediately — it won't be shown again. You'll use this in Step 3.
### Step 2: Assign the Storage Blob Data Contributor role
In the Azure portal, navigate to the storage account that contains your target blob container.
Click **Containers** and open the target container.
Click **Access Control (IAM)** > **Add role assignment**.
In the **Role** tab, select **Storage Blob Data Contributor**, then click **Next**.
In the **Members** tab, click **Select members** and search for the app registration you created in Step 1. Select it and click **Select**.
Click **Review + assign** to complete the role assignment.
### Step 3: Configure the external data source in C1
In C1, navigate to **Integrations** > **External data sources**.
Click **Add data source** and select **Azure Blob Storage** as the data source type.
Choose who will own and manage this integration, then click **Create and add details**.
Select **Azure Blob Storage** as the data source type.
Enter the **Tenant ID**, **Client ID**, and **Client secret** you saved in Step 1.
Enter the names of your **Storage account** and the blob **Container name** within the storage account.
Click **Save**.
**Done.** C1 can now read from and write to your Azure Blob container.