> ## Documentation Index
> Fetch the complete documentation index at: https://www.c1.ai/docs/llms.txt
> Use this file to discover all available pages before exploring further.
# Create an access review campaign
> Create one-time user access review (UAR) campaigns or reusable campaign templates. Scope campaigns by entitlements, by access conflicts, or by inheritance across a cloud infrastructure resource hierarchy.
## Why run an access review campaign?
Access review campaigns help Security and IT teams to securely control what software users can access, all while making sure employees can also successfully complete their work.
From a least privilege and security perspective, ensuring that users only have the access they need, for only as long as they need it, reduces the access footprint of your company for sensitive systems and data. Running regular access review campaigns also helps you to achieve compliance with security standards and audit requirements.
## View all campaigns
On the **Campaigns** page, campaigns are sorted by state and type:
* **Running** campaigns are currently in progress.
* **Draft** campaigns have not yet started.
* **Completed** campaigns have ended.
* **Templates** are saved campaign outlines used to create one-time or recurring scheduled campaigns.
## How do campaign templates work?
If there's a campaign pattern you use repeatedly, create a reusable campaign template instead of configuring the same campaign from scratch every time.
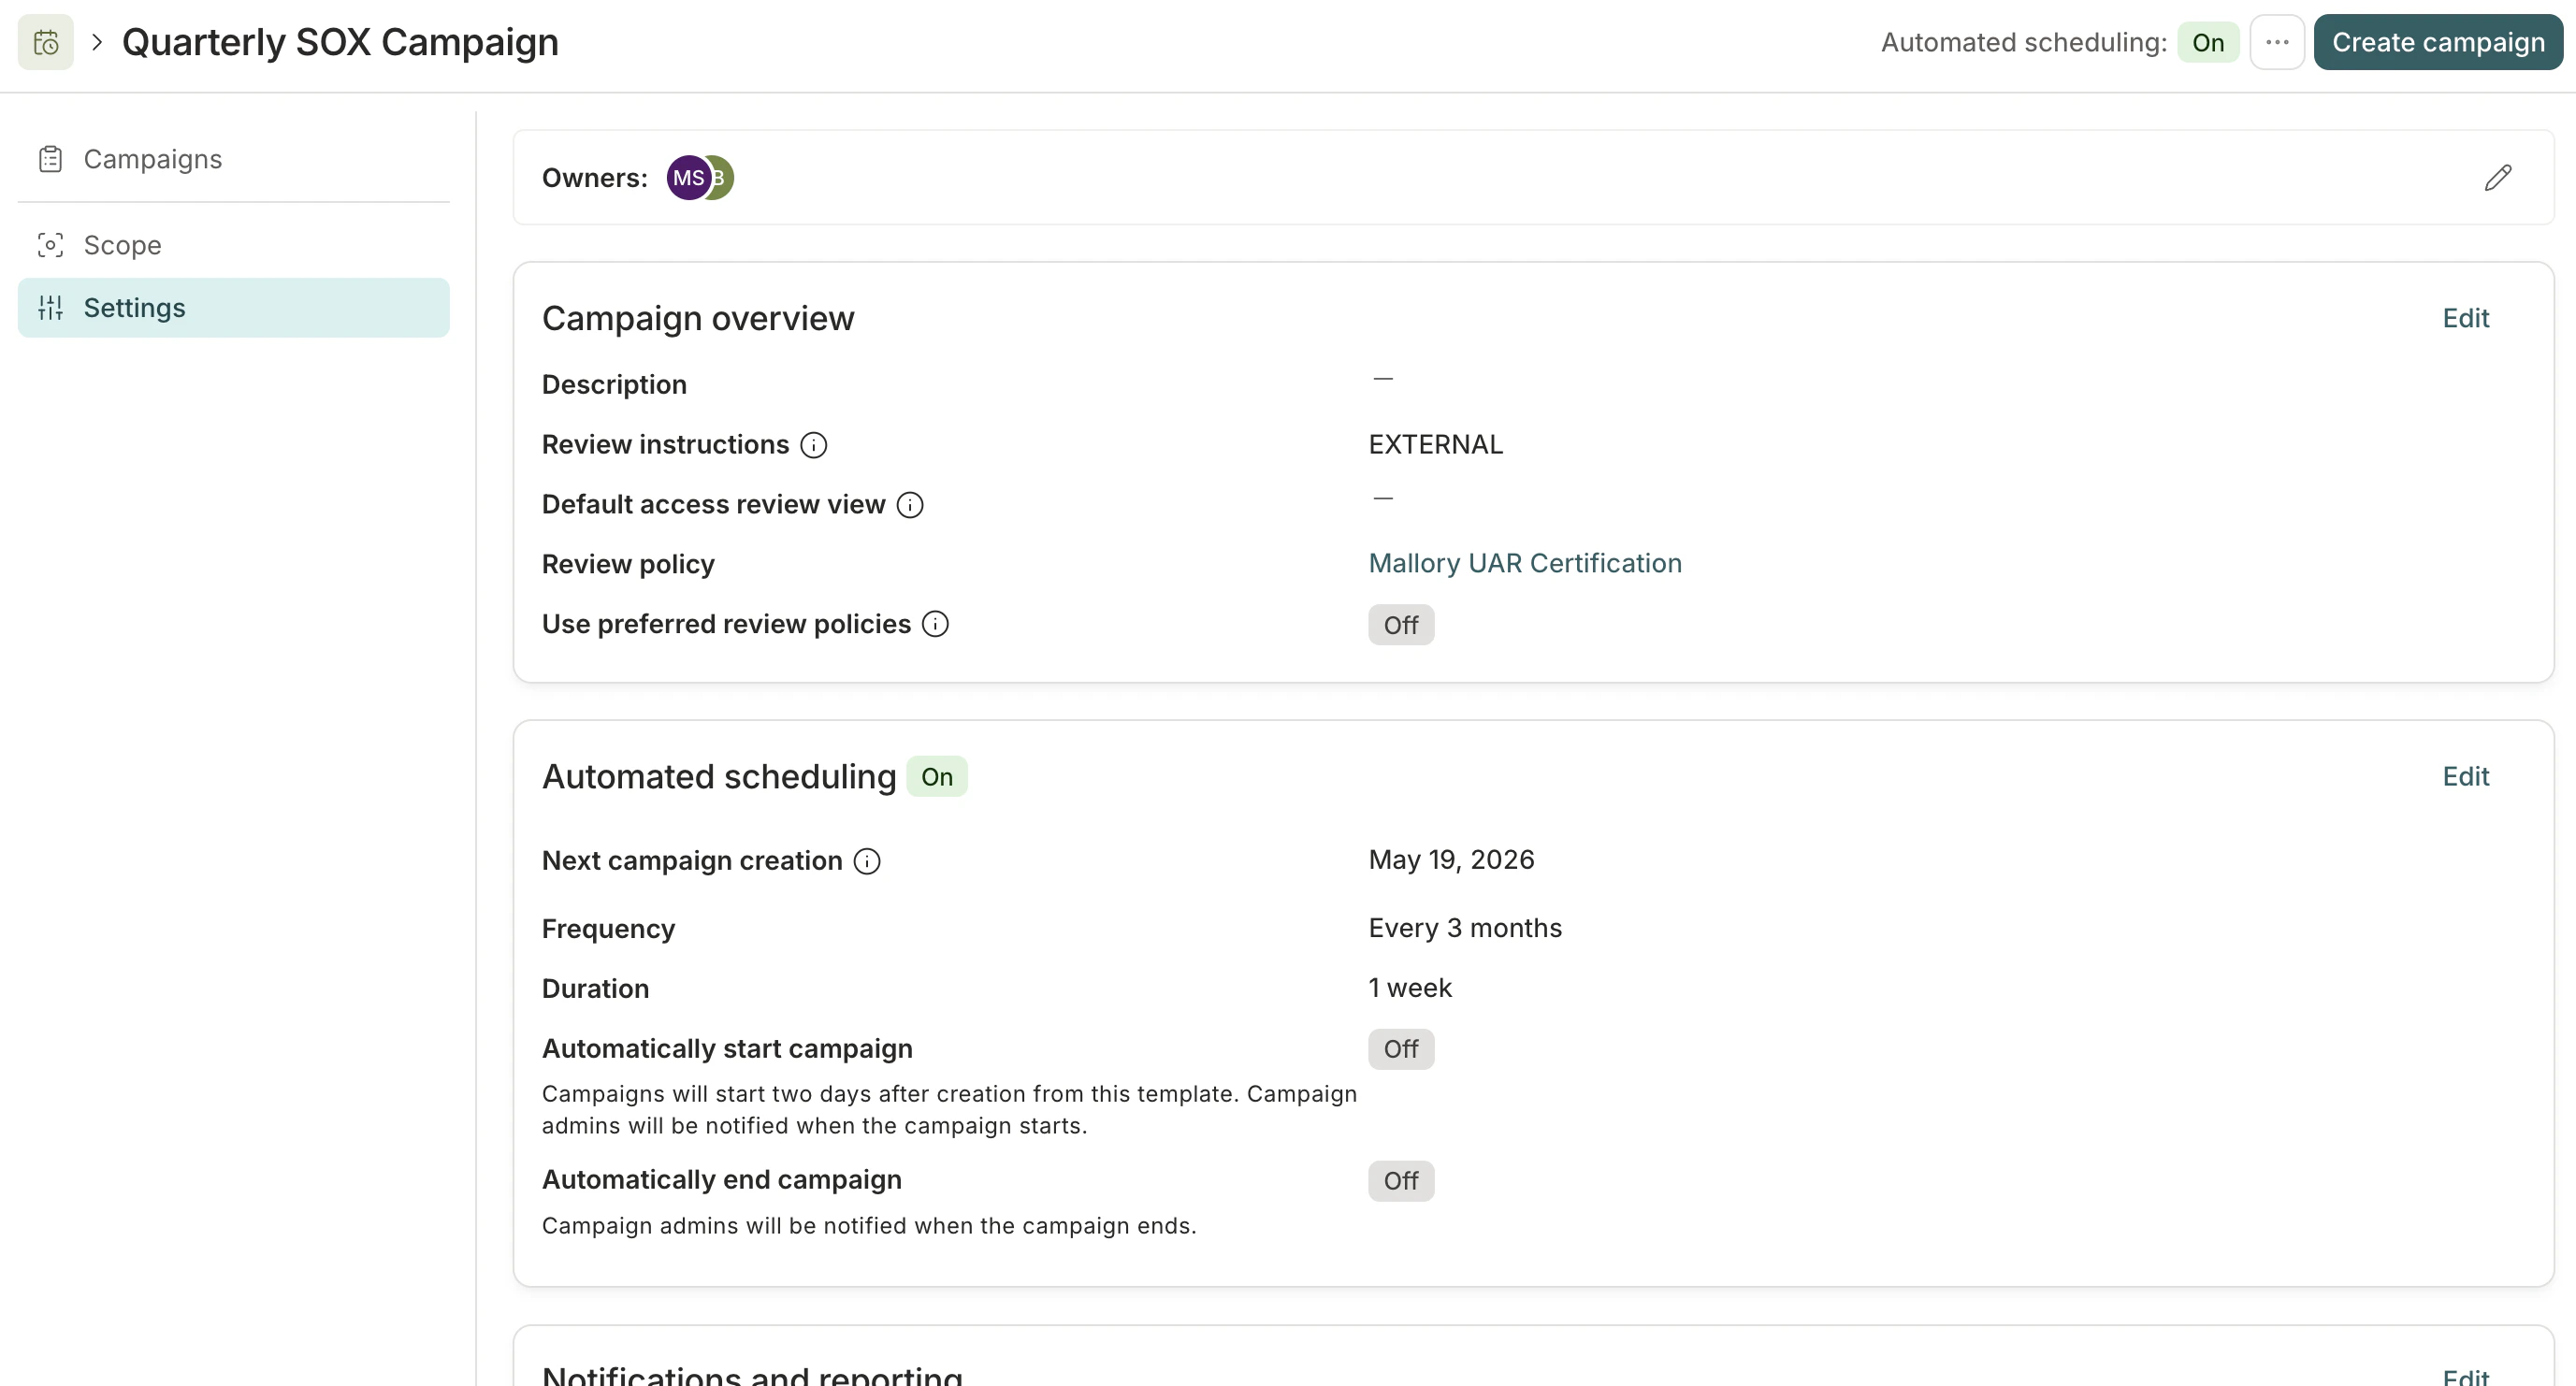 Once a campaign template is set up, use it to create single campaigns whenever you need them or set a schedule for automated campaign creation. When a schedule is running, C1 automatically creates new instances of the campaign for you and adds them to the **Drafts** tab. You can review, fine-tune, and start these campaigns when you're ready.
**Need to reuse a campaign just once?**
Duplicate any existing campaign from the **...** (more actions) menu on the **Running**, **Drafts**, or **Completed** tabs.
## Create a new campaign
Follow this process to create a single campaign. Jump to [Create a campaign template](/product/admin/campaigns#create-a-campaign-template) to set up a template that can be used to create many similar campaigns.
C1 offers three ways to define what a campaign covers:
* **By entitlements** — Select specific entitlements, apps, or resource types to review. This is the standard approach and works for any app in C1.
* **By access conflicts** — Review access that has triggered violations in your conflict monitors. Choose **Access conflicts** as the review type in Step 1 below.
* **By inheritance** — Scope the campaign to resources and role assignments in a cloud infrastructure app, and let C1 resolve all access that flows into them through the resource hierarchy. See [Scope an access review campaign by inheritance](/product/admin/campaign-scope-by-inheritance) for details.
Only users with the **Campaign Administrator** or **Super Administrator** [user roles](/product/admin/user-roles) in C1 can create and manage campaigns. Campaign admins can only manage the campaigns that they also own.
### Step 1: Set up the campaign
Navigate to **Governance** > **Campaigns**.
Click **New campaign**.
Fill out the form, providing the following information:
* **Name**: The campaign's name, which will be displayed to reviewers and shown in the campaign list view.
* **Description**: The description of what this campaign entails and any directions you want to deliver to reviewers.
* **Campaign type**: Select **Single instance**, then set the **Due date** for the campaign.
* **Review scope type:** Select how the campaign will identify what to review:
* **By entitlements**: Review user access to specific entitlements or applications. This is the most common type of campaign.
* **By access conflicts**: Review user access that has triggered a violation in one of your enabled conflict monitors. This is a great option for quickly remediating high-risk access issues identified by your conflict monitors.
* **By inheritance**: Review access to cloud infrastructure apps by selecting resources and role assignments. C1 resolves all access that flows into your selections through the resource hierarchy, including inherited and group-based access. See [Scope an access review campaign by inheritance](/product/admin/campaign-scope-by-inheritance) for details.
* **Owner**: The campaign's owner, who will manage the campaign while it is in progress. You can set more than one campaign owner. Each owner must have the Campaign Administrator or Super Administrator user role in C1.
* **Review policy**: The campaign's default [review policy](/product/admin/policies). If needed, you'll be able to adjust the policy to be used for the review of individual entitlements later in the campaign creation process.
Click **Continue**. The campaign is created.
### Step 2: Configure how the campaign will run
On the new campaign's **Configuration** tab, review and update the details you've entered so far.
If you want to provide any instructions to reviewers about how to complete access reviews in this campaign, click **Edit** and enter the instructions in the **Review instructions** field.
The instructions you enter will be displayed to all reviewers at the top of the page where they complete their access reviews. You can format your instructions using Markdown to add emphasis, links, and structure.
If you want all reviewers to receive their campaign tasks in the same format, select a **Default access review view**:
* **By application:** review access to one application at a time
* **By resource:** review access organized by resource, so you can see all access across a resource tree in one place
* **By user:** review one user's access at a time
* **Unstructured:** all the assigned reviews together in one list
If a default view is selected, each reviewer's access reviews will open in that view, but individual reviewers can switch to a different view if desired.
By default, all campaign tasks will be created using the review policy you chose. If instead you want campaign tasks to use the review policies set on the entitlements or apps in the campaign, click **Edit** and click to turn on **Use preferred review policies**.
If this option is enabled, C1 will apply policies using this order of precedence: entitlement, application, campaign.
By default, campaigns are started and ended manually. If you want to automatically start or end the campaign, find the **Schedule** section of the page and click **Edit**.
* To automatically start the campaign on a specific date and time, click to turn on **Automatically start campaign**, then set the scheduled start date.
* If the campaign is set to automatically start, choose whether to proceed with auto-start if there are unresolved campaign data accuracy issues. Campaign owners will be notified of any data accuracy issues when they are discovered.
* To automatically end the campaign on a specific date, click to turn on **Automatically end campaign**, then set the date.
* If the campaign is set to automatically end, choose whether incomplete reviews will be revoked or skipped when the campaign ends.
In the **Notifications and reporting** section, you can configure what notifications the campaign will automatically generate:
* Notify all reviewers with assigned review tasks when the campaign begins
* Notify all campaign owners and reviewers when the campaign ends
* When the campaign is complete, generate a campaign report and notify all campaign owners when it's ready for download
If you do not pre-configure these options here, you'll have another chance to send out notifications and generate a report when ending the campaign.
If you want to use a Slack channel for communication about this campaign, click **Add Slack channel**. Enter a Slack channel name, either an existing channel in your workspace or the name for a new channel you want to create.
All campaign owners and users assigned access reviews will be automatically added to this channel when the campaign starts.
**Sending campaign notifications to a private Slack channel?** Make sure the [C1 app for Slack](/product/admin/integration-for-Slack) is added to the channel before you configure it here, or the notifications won't be delivered.
**Optional.** To surface app user profile attributes to reviewers during access reviews, find the **Attribute visibility** section and click **+ Add attribute**. For each attribute you want to show, select an app and the attribute key — for example, **department** on AWS PROD. Each app-attribute combination is configured as a separate entry. Reviewers see no attributes by default; only those you configure here will be visible.
See [Map user attributes](/product/admin/attributes) to learn how attributes are defined in C1.
### Step 3: Choose what to review
Next, build a list of the resources that your campaign will review.
On the **Scope** tab of your campaign, find the **Apps and entitlements** section of the page and click **Make selections**.
* To run a UAR on user access to specific permissions, click **Review specific resources** and select resources, then click **Save**.
When selecting specific resources, you can use the filter bar to narrow results by **Application**, **Resource type**, **Risk level**, and **Compliance framework**. Select one or more values for any filter to find matching entitlements. Filters use **OR** logic within a single filter type and **AND** logic across filter types. For example, selecting risk levels "High" and "Critical" along with compliance framework "SOX" returns entitlements that are (High OR Critical) AND (SOX).
**OR**
* To run a UAR on user access to applications, click **Review application access** and select apps, then click **Save**.
**OR**
* To run a UAR on all of the resources of a given resource type within a specific app (such as all the groups within Google Workspace), click **Review resources by type** and select the resource types for each applicable application, then click **Save**.
**OR**
* To run a UAR on all entitlements that match a certain risk level or compliance framework, click **By criteria** and select the relevant risk levels and compliance frameworks, then click **Save**. The campaign will include all entitlements that match the criteria you select when you prepare the campaign.
**You cannot mix selections from the four tabs in a single campaign.** If you want to review both application access and non-access resources in a single campaign, select **Review specific resources** or **Review resources by type** and add the **Credential** resource type to the campaign.
**Don't see risk level or compliance framework values in the filter dropdowns?** You must first create attribute values in **Settings** > **Tags** and assign them to entitlements. See [Setting entitlement attributes](/product/admin/managing-entitlements#setting-entitlement-attributes) for details.
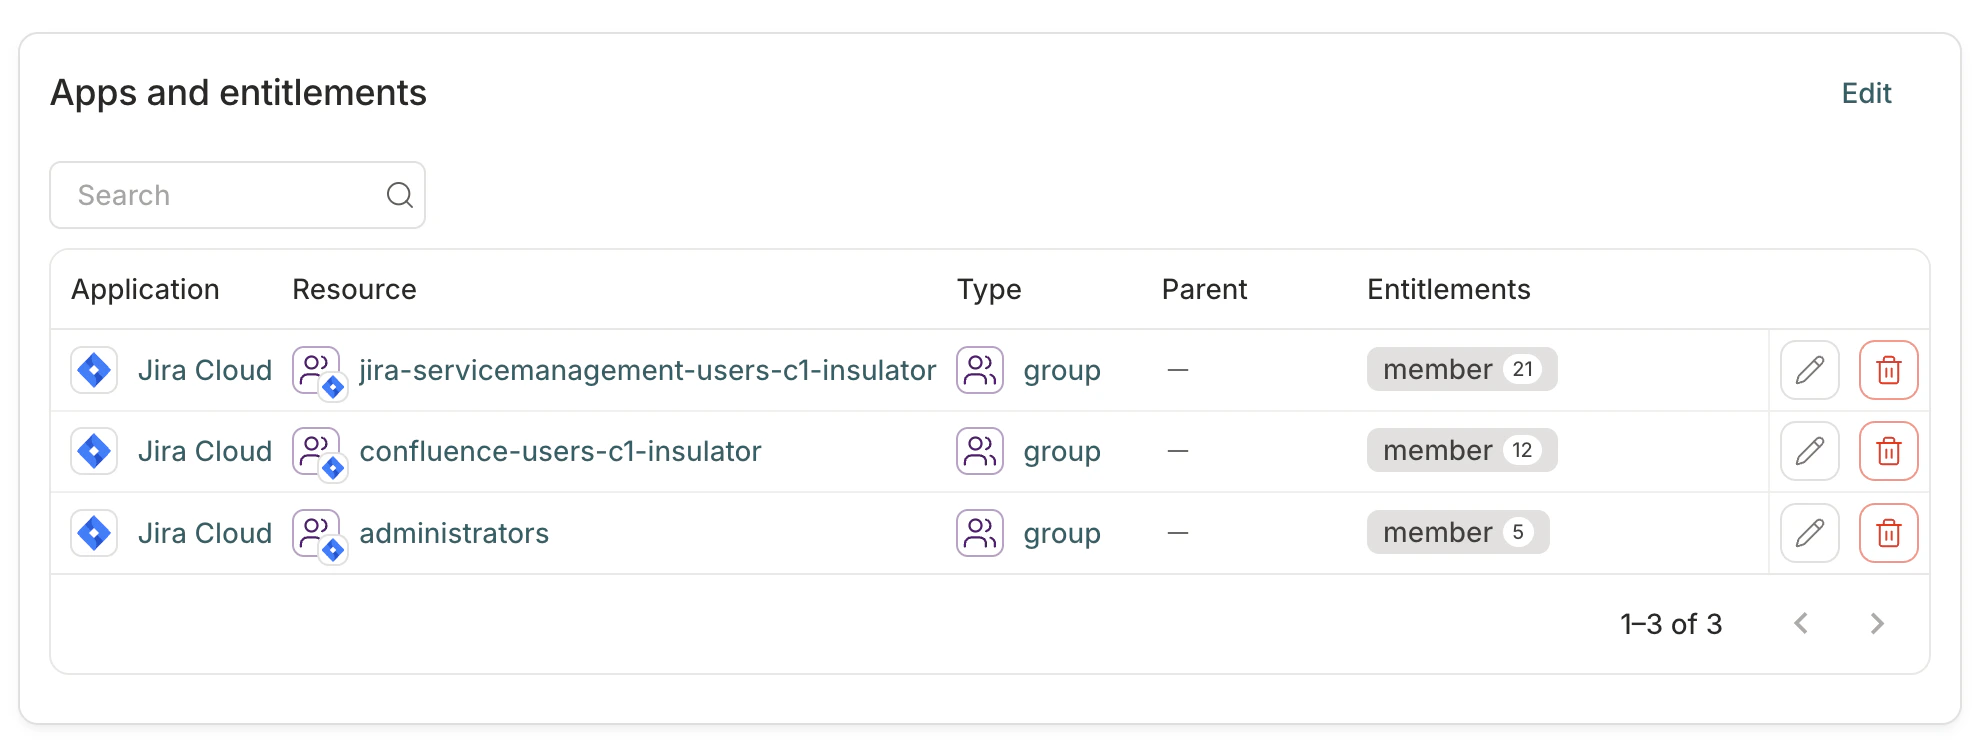
If you're building a UAR reviewing specific resources, click the pencil icon to update the policy used to review specific entitlements, or the trashcan icon to remove an entitlement from the review.
Once a campaign template is set up, use it to create single campaigns whenever you need them or set a schedule for automated campaign creation. When a schedule is running, C1 automatically creates new instances of the campaign for you and adds them to the **Drafts** tab. You can review, fine-tune, and start these campaigns when you're ready.
**Need to reuse a campaign just once?**
Duplicate any existing campaign from the **...** (more actions) menu on the **Running**, **Drafts**, or **Completed** tabs.
## Create a new campaign
Follow this process to create a single campaign. Jump to [Create a campaign template](/product/admin/campaigns#create-a-campaign-template) to set up a template that can be used to create many similar campaigns.
C1 offers three ways to define what a campaign covers:
* **By entitlements** — Select specific entitlements, apps, or resource types to review. This is the standard approach and works for any app in C1.
* **By access conflicts** — Review access that has triggered violations in your conflict monitors. Choose **Access conflicts** as the review type in Step 1 below.
* **By inheritance** — Scope the campaign to resources and role assignments in a cloud infrastructure app, and let C1 resolve all access that flows into them through the resource hierarchy. See [Scope an access review campaign by inheritance](/product/admin/campaign-scope-by-inheritance) for details.
Only users with the **Campaign Administrator** or **Super Administrator** [user roles](/product/admin/user-roles) in C1 can create and manage campaigns. Campaign admins can only manage the campaigns that they also own.
### Step 1: Set up the campaign
Navigate to **Governance** > **Campaigns**.
Click **New campaign**.
Fill out the form, providing the following information:
* **Name**: The campaign's name, which will be displayed to reviewers and shown in the campaign list view.
* **Description**: The description of what this campaign entails and any directions you want to deliver to reviewers.
* **Campaign type**: Select **Single instance**, then set the **Due date** for the campaign.
* **Review scope type:** Select how the campaign will identify what to review:
* **By entitlements**: Review user access to specific entitlements or applications. This is the most common type of campaign.
* **By access conflicts**: Review user access that has triggered a violation in one of your enabled conflict monitors. This is a great option for quickly remediating high-risk access issues identified by your conflict monitors.
* **By inheritance**: Review access to cloud infrastructure apps by selecting resources and role assignments. C1 resolves all access that flows into your selections through the resource hierarchy, including inherited and group-based access. See [Scope an access review campaign by inheritance](/product/admin/campaign-scope-by-inheritance) for details.
* **Owner**: The campaign's owner, who will manage the campaign while it is in progress. You can set more than one campaign owner. Each owner must have the Campaign Administrator or Super Administrator user role in C1.
* **Review policy**: The campaign's default [review policy](/product/admin/policies). If needed, you'll be able to adjust the policy to be used for the review of individual entitlements later in the campaign creation process.
Click **Continue**. The campaign is created.
### Step 2: Configure how the campaign will run
On the new campaign's **Configuration** tab, review and update the details you've entered so far.
If you want to provide any instructions to reviewers about how to complete access reviews in this campaign, click **Edit** and enter the instructions in the **Review instructions** field.
The instructions you enter will be displayed to all reviewers at the top of the page where they complete their access reviews. You can format your instructions using Markdown to add emphasis, links, and structure.
If you want all reviewers to receive their campaign tasks in the same format, select a **Default access review view**:
* **By application:** review access to one application at a time
* **By resource:** review access organized by resource, so you can see all access across a resource tree in one place
* **By user:** review one user's access at a time
* **Unstructured:** all the assigned reviews together in one list
If a default view is selected, each reviewer's access reviews will open in that view, but individual reviewers can switch to a different view if desired.
By default, all campaign tasks will be created using the review policy you chose. If instead you want campaign tasks to use the review policies set on the entitlements or apps in the campaign, click **Edit** and click to turn on **Use preferred review policies**.
If this option is enabled, C1 will apply policies using this order of precedence: entitlement, application, campaign.
By default, campaigns are started and ended manually. If you want to automatically start or end the campaign, find the **Schedule** section of the page and click **Edit**.
* To automatically start the campaign on a specific date and time, click to turn on **Automatically start campaign**, then set the scheduled start date.
* If the campaign is set to automatically start, choose whether to proceed with auto-start if there are unresolved campaign data accuracy issues. Campaign owners will be notified of any data accuracy issues when they are discovered.
* To automatically end the campaign on a specific date, click to turn on **Automatically end campaign**, then set the date.
* If the campaign is set to automatically end, choose whether incomplete reviews will be revoked or skipped when the campaign ends.
In the **Notifications and reporting** section, you can configure what notifications the campaign will automatically generate:
* Notify all reviewers with assigned review tasks when the campaign begins
* Notify all campaign owners and reviewers when the campaign ends
* When the campaign is complete, generate a campaign report and notify all campaign owners when it's ready for download
If you do not pre-configure these options here, you'll have another chance to send out notifications and generate a report when ending the campaign.
If you want to use a Slack channel for communication about this campaign, click **Add Slack channel**. Enter a Slack channel name, either an existing channel in your workspace or the name for a new channel you want to create.
All campaign owners and users assigned access reviews will be automatically added to this channel when the campaign starts.
**Sending campaign notifications to a private Slack channel?** Make sure the [C1 app for Slack](/product/admin/integration-for-Slack) is added to the channel before you configure it here, or the notifications won't be delivered.
**Optional.** To surface app user profile attributes to reviewers during access reviews, find the **Attribute visibility** section and click **+ Add attribute**. For each attribute you want to show, select an app and the attribute key — for example, **department** on AWS PROD. Each app-attribute combination is configured as a separate entry. Reviewers see no attributes by default; only those you configure here will be visible.
See [Map user attributes](/product/admin/attributes) to learn how attributes are defined in C1.
### Step 3: Choose what to review
Next, build a list of the resources that your campaign will review.
On the **Scope** tab of your campaign, find the **Apps and entitlements** section of the page and click **Make selections**.
* To run a UAR on user access to specific permissions, click **Review specific resources** and select resources, then click **Save**.
When selecting specific resources, you can use the filter bar to narrow results by **Application**, **Resource type**, **Risk level**, and **Compliance framework**. Select one or more values for any filter to find matching entitlements. Filters use **OR** logic within a single filter type and **AND** logic across filter types. For example, selecting risk levels "High" and "Critical" along with compliance framework "SOX" returns entitlements that are (High OR Critical) AND (SOX).
**OR**
* To run a UAR on user access to applications, click **Review application access** and select apps, then click **Save**.
**OR**
* To run a UAR on all of the resources of a given resource type within a specific app (such as all the groups within Google Workspace), click **Review resources by type** and select the resource types for each applicable application, then click **Save**.
**OR**
* To run a UAR on all entitlements that match a certain risk level or compliance framework, click **By criteria** and select the relevant risk levels and compliance frameworks, then click **Save**. The campaign will include all entitlements that match the criteria you select when you prepare the campaign.
**You cannot mix selections from the four tabs in a single campaign.** If you want to review both application access and non-access resources in a single campaign, select **Review specific resources** or **Review resources by type** and add the **Credential** resource type to the campaign.
**Don't see risk level or compliance framework values in the filter dropdowns?** You must first create attribute values in **Settings** > **Tags** and assign them to entitlements. See [Setting entitlement attributes](/product/admin/managing-entitlements#setting-entitlement-attributes) for details.
If you're building a UAR reviewing specific resources, click the pencil icon to update the policy used to review specific entitlements, or the trashcan icon to remove an entitlement from the review.
 **Optional.** Find the **User selection** section of the page and click **Make selections**.
If you don't make any selections here, all users with access to the apps or resources you selected above will be added to the campaign. If you want to narrow the focus of the UAR:
* Click **Select specific users** to build a list of users whose access will be reviewed, then click **Save**.
**OR**
* Click **Select users by criteria** to review users who match the criteria you set, then click **Save**.
You can mix and match these options:
* User status in C1
* Direct reports of a manager
* [User profile attributes](/product/admin/attributes). For example, to run an access review campaign on all the AcmeApp users in your company with the job title "Engineer", create the parameter **User AcmeJob is Engineer**.
* Exclude users in specific groups from the campaign
**OR**
* Click **CEL expression** to enter a [CEL expression](/product/admin/expressions) that describes the users you want to review. The expression must return a list of users to be valid.
**Optional.** Find the **Account parameters** section of the page and click **Make selections**.
If you don't make any selections here, all accounts with access to the apps or resources you selected above will be added to the campaign. If you want to narrow the focus of the UAR:
* Click **Select accounts by criteria** to review app accounts that match the criteria you set, then click **Save**.
You can mix and match these options:
* No account owner
* Account status
* Account type
* Account domain (specifically, whether the email address associated with the account has been [marked trusted](/product/admin/global-settings#set-trusted-domains) by a C1 admin at your organization)
**OR**
* Click **CEL expression** to enter a [CEL expression](/product/admin/expressions) that describes the accounts you want to review. The expression must return a list of accounts to be valid.
**Optional.** Find the **Grant parameters** section of the page and click **Make selections**.
If you don't make any selections here, all access grants of the apps or resources you selected above will be added to the campaign. If you want to narrow the focus of the UAR:
* Click **Select grants by criteria** to review only the access grants that match the criteria you set, then click **Save**.
You can mix and match these options:
* New grants added within the time period you select or between two specific dates
* Temporary (time-limited) or permanent grants
* Grants that have not been used in the time period you select (this information is not available for all applications)
* Direct grants (permissions assigned directly to users) or inherited grants (permissions assigned to a group or role, which are "inherited" by users assigned to that group or role)
* Grants sourced from access profiles (check the box to exclude these grants from your campaign)
A summary of your choices is shown on the **Scope** tab. Click **Validate scope** at any time to generate a report showing a preview of the campaign based on the current scope.
Once you're satisfied with your selections, move on to the next step.
### Step 4: Check data accuracy
If any of your selections are sourced from connectors or file uploads that have not been updated recently, you'll see an indicator and a **Your campaign might have data accuracy issues** banner on the **Accuracy** tab.
**Optional.** Find the **User selection** section of the page and click **Make selections**.
If you don't make any selections here, all users with access to the apps or resources you selected above will be added to the campaign. If you want to narrow the focus of the UAR:
* Click **Select specific users** to build a list of users whose access will be reviewed, then click **Save**.
**OR**
* Click **Select users by criteria** to review users who match the criteria you set, then click **Save**.
You can mix and match these options:
* User status in C1
* Direct reports of a manager
* [User profile attributes](/product/admin/attributes). For example, to run an access review campaign on all the AcmeApp users in your company with the job title "Engineer", create the parameter **User AcmeJob is Engineer**.
* Exclude users in specific groups from the campaign
**OR**
* Click **CEL expression** to enter a [CEL expression](/product/admin/expressions) that describes the users you want to review. The expression must return a list of users to be valid.
**Optional.** Find the **Account parameters** section of the page and click **Make selections**.
If you don't make any selections here, all accounts with access to the apps or resources you selected above will be added to the campaign. If you want to narrow the focus of the UAR:
* Click **Select accounts by criteria** to review app accounts that match the criteria you set, then click **Save**.
You can mix and match these options:
* No account owner
* Account status
* Account type
* Account domain (specifically, whether the email address associated with the account has been [marked trusted](/product/admin/global-settings#set-trusted-domains) by a C1 admin at your organization)
**OR**
* Click **CEL expression** to enter a [CEL expression](/product/admin/expressions) that describes the accounts you want to review. The expression must return a list of accounts to be valid.
**Optional.** Find the **Grant parameters** section of the page and click **Make selections**.
If you don't make any selections here, all access grants of the apps or resources you selected above will be added to the campaign. If you want to narrow the focus of the UAR:
* Click **Select grants by criteria** to review only the access grants that match the criteria you set, then click **Save**.
You can mix and match these options:
* New grants added within the time period you select or between two specific dates
* Temporary (time-limited) or permanent grants
* Grants that have not been used in the time period you select (this information is not available for all applications)
* Direct grants (permissions assigned directly to users) or inherited grants (permissions assigned to a group or role, which are "inherited" by users assigned to that group or role)
* Grants sourced from access profiles (check the box to exclude these grants from your campaign)
A summary of your choices is shown on the **Scope** tab. Click **Validate scope** at any time to generate a report showing a preview of the campaign based on the current scope.
Once you're satisfied with your selections, move on to the next step.
### Step 4: Check data accuracy
If any of your selections are sourced from connectors or file uploads that have not been updated recently, you'll see an indicator and a **Your campaign might have data accuracy issues** banner on the **Accuracy** tab.
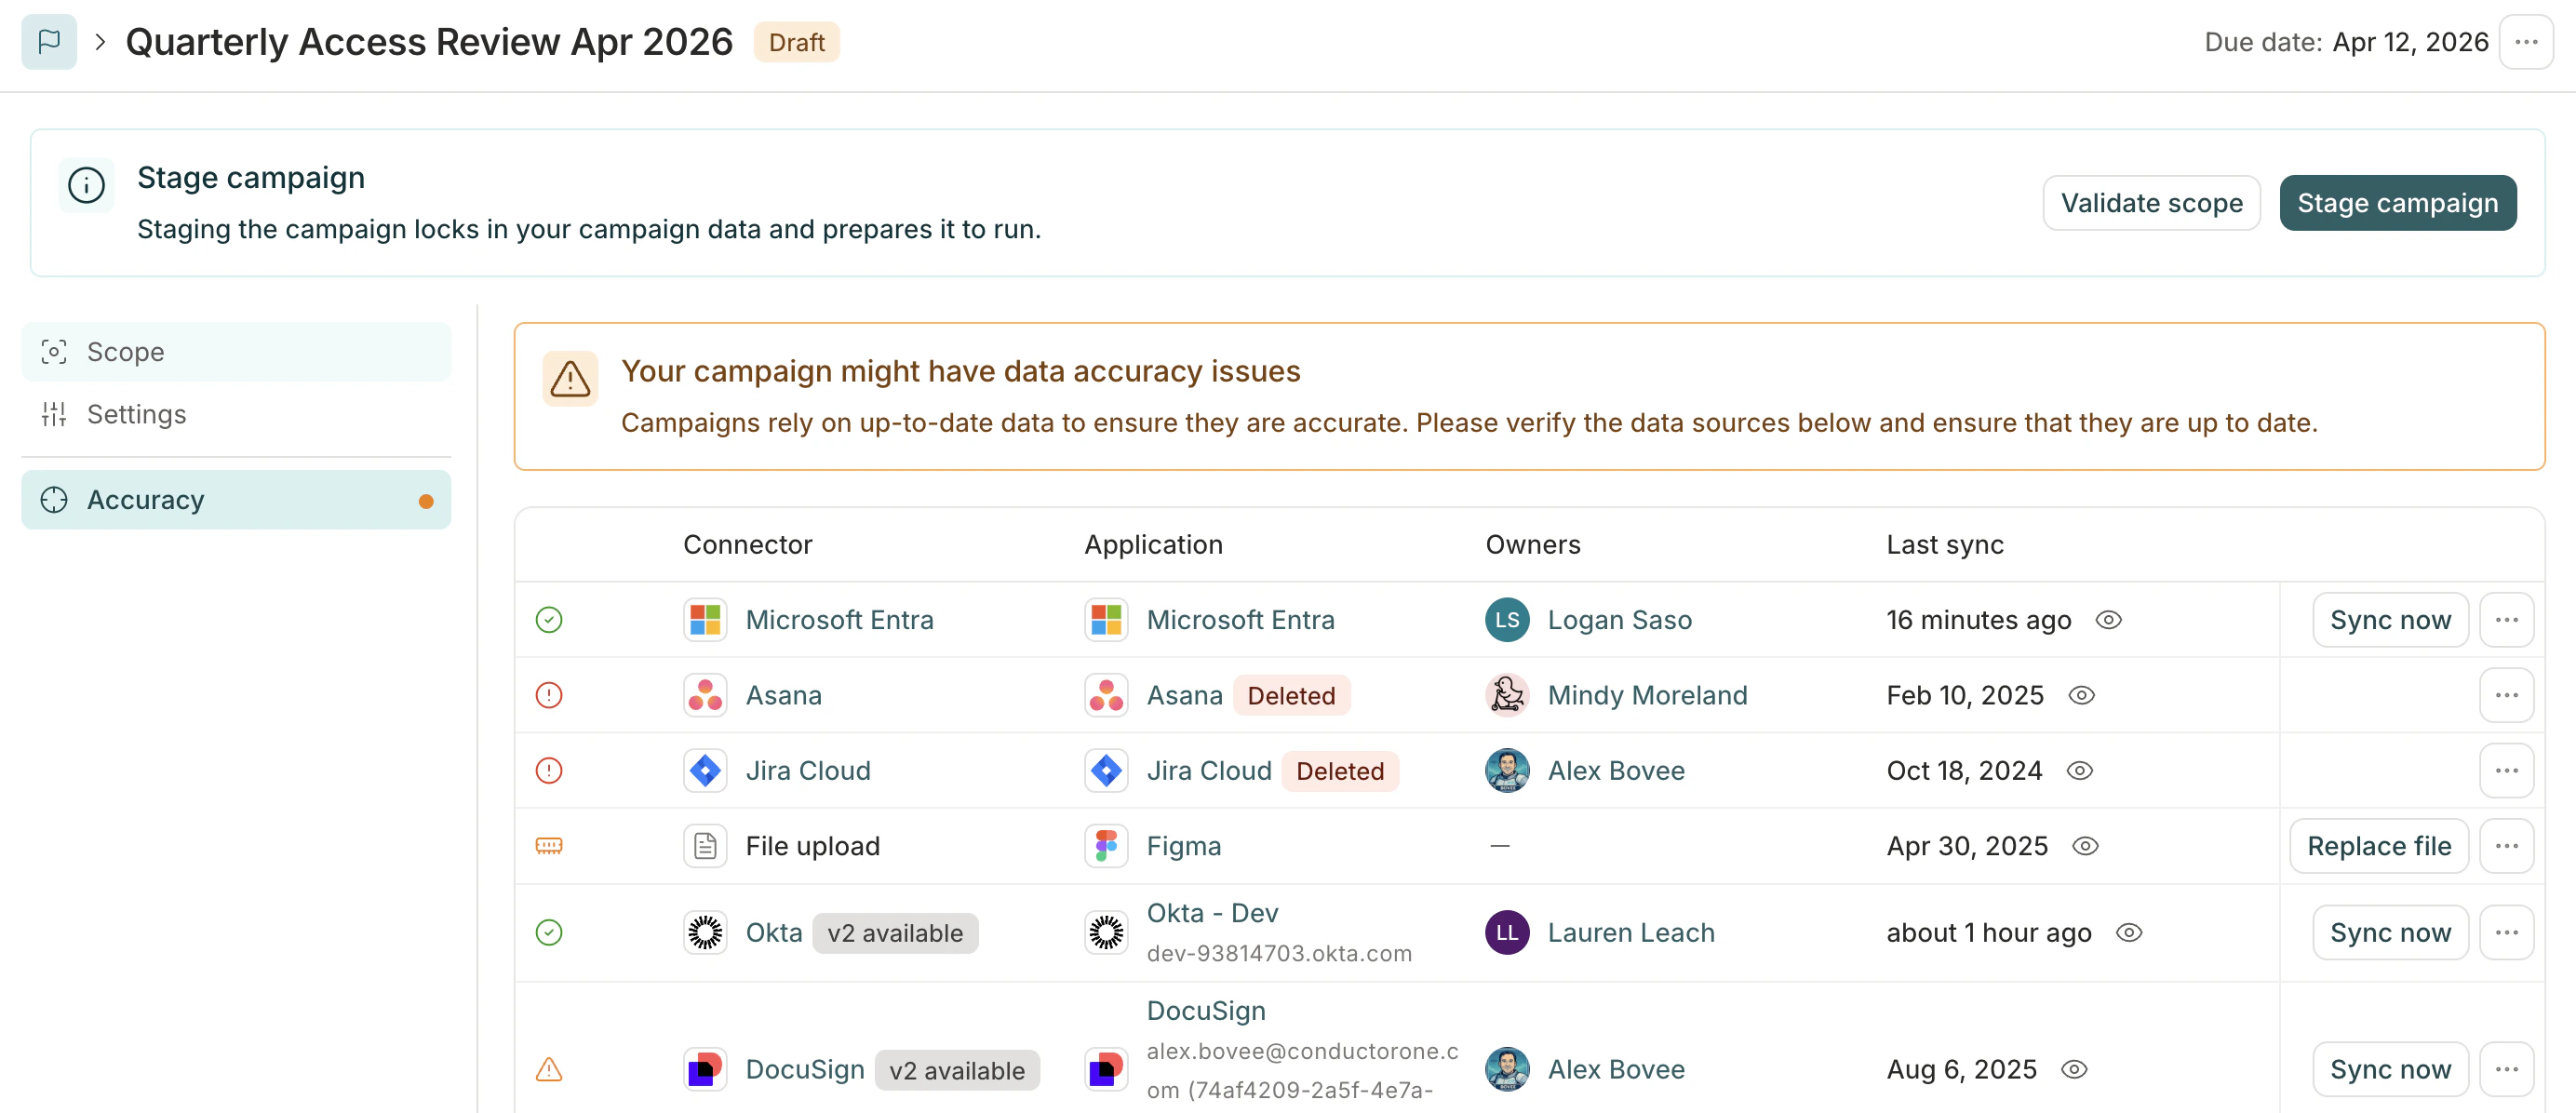 All data sources for your campaign are shown in the **Data sources** table. C1 flags data sources when:
* A connector hasn't synced for more than two days
* A file source hasn't been updated in more than seven days
* A connector errored during the most recent sync
Click the eye icon next to a **Last sync** timestamp to view details about the most recent connector sync or file upload.
Click **Sync now** (for connectors) or **Replace file** (for file sources) to update the data source and ensure your campaign is using up-to-date information.
**Do I have to resolve all data accuracy issues before I can prepare the campaign?**
No. This information is presented for your awareness and to help you ensure that your campaign's data is up to date. Resolving data accuracy warnings before proceeding is strongly recommended, but not required.
### Step 5: Stage the campaign
When you're ready, click **Stage campaign**. Staging a campaign generates the individual access review tasks, but does not launch the campaign. Depending on the size of the campaign, staging it might take several minutes.
**Your campaign is a snapshot of access data as it exists the moment you click this button.** Any access changes or updates to data sources that take place after you prepare the campaign will not be reflected in the campaign.
Review the draft campaign's details. If necessary, you can make changes on the **Configuration** tab, but you cannot alter the campaign's scope or policy once it has been prepared.
### Step 6: Start the campaign
If you've set up the campaign to automatically start, it will launch on the scheduled date. If not (or if you need to start the campaign sooner than the scheduled start date), follow these steps to start the campaign when you're ready:
When you're ready, click **Start campaign**. Select whether C1 should email campaign kickoff notifications to the users who are assigned the access reviews in the campaign.
Click **Start campaign**. Again, depending on the size of the campaign, starting it might take several minutes.
**Done.** Your access review campaign is underway. Check out [Manage active campaigns](/product/admin/manage-campaigns) to learn about campaign reminders, reports, and revoking access denied during the campaign.
## Duplicate a past campaign
Only users with the **Campaign Administrator** or **Super Administrator** [user roles](/product/admin/user-roles) in C1 can create and manage campaigns.
Instead of creating a campaign from scratch, you can save time and effort by duplicating a past campaign and tailoring it to your current needs. Duplicating a campaign is a quick way to reuse a past campaign's settings for a one-off review. If you need to run similar campaigns on a regular schedule, [create a campaign template](/product/admin/campaigns#create-a-campaign-template) instead.
Navigate to **Governance** > **Campaigns**.
Locate and click on the name of the campaign that you want to duplicate.
From the more actions (…) menu, select **Duplicate**.
Review the campaign's details and update the information as necessary.
Follow the instructions above to validate, stage, and start the duplicate campaign.
**Done.** Your duplicated access review campaign is underway.
## Create a campaign template
Only users with the **Campaign Administrator** or **Super Administrator** [user roles](/product/admin/user-roles) in C1 can create and manage campaign templates.
### Step 1: Set up the template
Navigate to **Governance** > **Campaigns**.
Click **New campaign**.
Fill out the form, providing the following information:
* **Name**: The campaign's name, which will be displayed to reviewers and shown in the campaign list view.
* **Description**: The description of what this campaign entails and any directions you want to deliver to reviewers.
* **Campaign type**: Select **Template**, then set the **Campaign duration**, or how long each campaign created from the template will run.
* **Review scope type:** Select how campaigns created from this template will identify what to review:
* **By entitlements**: Review user access to specific entitlements or applications. This is the most common type of campaign.
* **By access conflicts**: Review user access that has triggered a violation in one of your enabled conflict monitors. This is a great option for quickly remediating high-risk access issues identified by your conflict monitors.
* **By inheritance**: Review access to cloud infrastructure apps by selecting resources and role assignments. C1 resolves all access that flows into your selections through the resource hierarchy, including inherited and group-based access. See [Scope an access review campaign by inheritance](/product/admin/campaign-scope-by-inheritance) for details.
* **Owner**: The campaign's owner, who will manage the campaign while it is in progress. You can set more than one campaign owner, just be sure anyone you add has the Campaign Administrator or Super Administrator user role in C1.
* **Review policy**: The campaign's default [review policy](/product/admin/policies). If needed, you'll be able to adjust the policy to be used for the review of individual entitlements later in the campaign creation process.
Click **Continue**. The template is created.
### Step 2: Configure how campaigns created from this template will run
You can set the template to create instances of the campaign on a date in the future or on a recurring schedule. You can also create an on-demand instance of the campaign at any time.
**Want to create a campaign from this template right now?**
On the **Campaigns** tab, click **Create campaign** to create an on-demand draft campaign from the template.
On the new template's **Configuration** tab, review and update the details you've entered so far.
If you want to provide any instructions to reviewers about how to complete access reviews in campaigns created from this template, click **Edit** and enter the instructions in the **Review instructions** field.
The instructions you enter will be displayed to all reviewers at the top of the page where they complete their access reviews. You can format your instructions using Markdown to add emphasis, links, and structure.
If you want all reviewers to receive their campaign tasks in the same format, select a **Default access review view**:
* **By application:** review access to one application at a time
* **By resource:** review access organized by resource, so you can see all access across a resource tree in one place
* **By user:** review one user's access at a time
* **Unstructured:** all the assigned reviews together in one list
If a default view is selected, each reviewer's access reviews will open in that view, but individual reviewers can switch to a different view if desired.
By default, all campaign tasks will be created using the review policy you chose. If instead you want campaign tasks to use the review policies set on the entitlements or apps in the campaign, click **Edit** and click to turn on **Use preferred review policies**.
If this option is enabled, C1 will apply policies using this order of precedence: entitlement, application, campaign.
**Optional.** If you'd like to automatically create draft instances of this campaign, either once on a date in the future or regularly on a set schedule, go to the **Schedule** area of the page and click **Edit**.
Click to turn on **Schedule**.
Choose the date you want a draft instance of this campaign to be created.
Using the **Frequency** selector, choose a frequency option to automatically create recurring instances of the campaign, beginning on the date you chose and recurring at the frequency you set.
Choose **None** if you only want to create a single scheduled instance of the campaign on the date you chose.
New campaign drafts will be created on the scheduled dates, at around 8:30 AM Pacific time. The template's owners will be notified by email that a new draft campaign has been set up.
By default, campaigns created from this template are started and ended manually. If you want to automatically start or end campaigns created from this template, configure these settings:
* To automatically start each campaign, click to turn on **Automatically start campaign**. Campaigns will auto-start two days after they are created from this template.
* If the campaign is set to automatically start, choose whether to proceed with auto-start if there are unresolved campaign data accuracy issues. Campaign owners will be notified of any data accuracy issues when they are discovered.
* To automatically end each campaign on the scheduled end date calculated from the campaign duration you set, click to turn on **Automatically end campaign**.
* If the campaign is set to automatically end, choose whether incomplete reviews will be revoked or skipped when the campaign ends.
In the **Notifications and reporting** section, configure whether to automatically send out notifications about the campaigns generated from this template:
* Notify all reviewers with assigned review tasks when a campaign begins
* Notify all campaign owners and reviewers when a campaign ends
* When a campaign is complete, generate a campaign report and notify all campaign owners when it's ready for download
If you do not pre-configure these options here, you'll have another chance to send out notifications and generate a report when ending the campaign.
If you want to use a Slack channel for communication about this campaign, click **Add Slack channel**. Enter a Slack channel name, either an existing channel in your workspace or the name for a new channel you want to create.
When a new campaign made from this template starts, all campaign owners and users assigned access reviews will be automatically added to this channel.
When new campaign instances are created from this template, you'll have a chance to change the Slack channel before starting the campaign.
**Sending campaign notifications to a private Slack channel?** Make sure the [C1 app for Slack](/product/admin/integration-for-Slack) is added to the channel before you configure it here, or the notifications won't be delivered.
**Optional.** To surface app user profile attributes to reviewers during access reviews, find the **Attribute visibility** section and click **+ Add attribute**. For each attribute you want to show, select an app and the attribute key — for example, **department** on AWS PROD. Each app-attribute combination is configured as a separate entry. Reviewers see no attributes by default; only those you configure here will be visible.
See [Map user attributes](/product/admin/attributes) to learn how attributes are defined in C1.
### Step 3: Choose what to review
Next, build a list of the resources that campaigns made from this template will review.
On the **Scope** tab of your template, find the **Apps and entitlements** section of the page and click **Make selections**.
* To run a UAR on user access to specific permissions, click **Review specific resources** and select resources, then click **Save**.
When selecting specific resources, you can use the filter bar to narrow results by **Application**, **Resource type**, **Risk level**, and **Compliance framework**. Select one or more values for any filter to find matching entitlements. Filters use **OR** logic within a single filter type and **AND** logic across filter types. For example, selecting risk levels "High" and "Critical" along with compliance framework "SOX" returns entitlements that are (High OR Critical) AND (SOX).
**OR**
* To run a UAR on user access to applications, click **Review application access** and select apps, then click **Save**.
**OR**
* To run a UAR on all of the resources of a given resource type within a specific app (such as all the groups within Google Workspace), click **Review resources by type** and select the resource types for each applicable application, then click **Save**.
**OR**
* To run a UAR on all entitlements that match a certain risk level or compliance framework, click **By criteria** and select the relevant risk levels and compliance frameworks, then click **Save**. The campaign will include all entitlements that match the criteria you select when you prepare the campaign.
**You cannot mix selections from the four tabs in a single campaign.** If you want to review both application access and non-access resources in a single campaign, select **Review specific resources** or **Review resources by type** and add the **Credential** resource type to the campaign.
**Don't see risk level or compliance framework values in the filter dropdowns?** You must first create attribute values in **Settings** > **Tags** and assign them to entitlements. See [Setting entitlement attributes](/product/admin/managing-entitlements#setting-entitlement-attributes) for details.
If you're building a UAR reviewing specific resources, click the pencil icon to update the policy used to review specific entitlements, or the trashcan icon to remove an entitlement from the review.
**Optional.** Find the **User selection** section of the page and click **Make selections**.
If you don't make any selections here, all users with access to the apps or resources you selected above will be added to the campaign. If you want to narrow the focus of the UAR:
* Click **Select specific users** to build a list of users whose access will be reviewed, then click **Save**.
**OR**
* Click **Select users by criteria** to review users who match the criteria you set, then click **Save**.
You can mix and match these options:
* User status in C1
* Direct reports of a manager
* [User profile attributes](/product/admin/attributes). For example, to run an access review campaign on all the AcmeApp users in your company with the job title "Engineer", create the parameter **User AcmeJob is Engineer**.
**Optional.** Find the **Account parameters** section of the page and click **Make selections**.
If you don't make any selections here, all accounts with access to the apps or resources you selected above will be added to the campaign. If you want to narrow the focus of the UAR:
* Click **Select accounts by criteria** to review app accounts that match the criteria you set, then click **Save**.
You can mix and match these options:
* No account owner
* Account status
* Account type
* Account domain (specifically, whether the email address associated with the account has been [marked trusted](/product/admin/global-settings#set-trusted-domains) by a C1 admin at your organization)
**Optional.** Find the **Grant parameters** section of the page and click **Make selections**.
If you don't make any selections here, all access grants of the apps or resources you selected above will be added to the campaign. If you want to narrow the focus of the UAR:
* Click **Select grants by criteria** to review only the access grants that match the criteria you set, then click **Save**.
You can mix and match these options:
* New grants added within the time period you select or between two specific dates
* Temporary (time-limited) or permanent grants
* Grants that have not been used in the time period you select (this information is not available for all applications)
* Direct grants (permissions assigned directly to users) or inherited grants (permissions assigned to a group or role, which are "inherited" by users assigned to that group or role)
* Grants sourced from access profiles (check the box to exclude these grants from your campaign)
A summary of your choices is shown on the **Scope** tab. Click **Validate scope** at any time to generate a report showing a preview of a campaign made from the template based on the current scope.
Once you're satisfied with your selections, move on to the next step.
#### Dynamic scope re-evaluation for tag-filtered templates
When you use risk level or compliance framework filters to select entitlements for a campaign template, C1 saves the **filter criteria** rather than a fixed list of entitlements. Each time a campaign is created from the template and prepared, the system re-evaluates the tag criteria against the current state of your entitlements. This means:
* Entitlements that have been tagged since the template was last configured are **automatically included** in the next campaign.
* Entitlements that have had tags removed are **automatically excluded**.
* You do not need to manually update the template scope when entitlement tags change.
Use **Validate scope** before preparing a campaign to review which entitlements currently match the template's tag criteria and confirm the scope is as expected.
Tag-based scope filtering applies only to [entitlement attribute values](/product/admin/managing-entitlements#setting-entitlement-attributes) (risk level and compliance framework). Custom tags are not supported for campaign scoping.
### Step 4: Review and start a campaign created from a template
When a new campaign is created from the template, it is shown on the template's **Campaigns** tab and also added to the **Drafts** tab.
Edit the campaign as needed, then follow Steps 4 through 6 in [Create a new campaign](/product/admin/campaigns#create-a-new-campaign) to review current data accuracy, stage the campaign, and start the campaign (if necessary).
## Frequently asked questions about creating campaigns
In short, nothing. If you select a resource for your campaign that does not have any grants on any of its entitlements, no review tasks will be created for the resource, as there is nothing to review. You can add these resources to your campaign without impact, or leave them out: it's up to you.
Yes, you can! Go to the running campaign's **Configuration** tab and add or edit the campaign instructions. Reviewers will see the new version of the instructions as soon as you click **Save**.
If your campaign template scope is filtered by risk level or compliance framework, newly tagged entitlements are automatically included the next time a campaign is created from the template and prepared. C1 saves the tag criteria, not a static list, so the scope is re-evaluated against current entitlement tags at each campaign preparation.
Tag-based filtering is used to narrow the list of entitlements shown when selecting specific resources. You select entitlements from the filtered results, and for campaign templates, the filter criteria are saved for dynamic re-evaluation. You cannot mix manually selected individual entitlements with a purely tag-driven dynamic scope in the same campaign.
You can filter entitlements by **risk level** and **compliance framework** — these are the built-in entitlement attribute types in C1. To use these filters, first create attribute values in **Settings** > **Tags** and assign them to your entitlements. See [Setting entitlement attributes](/product/admin/managing-entitlements#setting-entitlement-attributes) for setup instructions.
No. The scope type you choose when creating a campaign cannot be changed afterward. If you need a different scope type, create a new campaign.
If you scope a campaign by **All** conflict monitors, the campaign includes all violations from every enabled monitor at the time the campaign is prepared. Monitors enabled after the campaign is prepared are not included. To include new monitors, create a new campaign.
All data sources for your campaign are shown in the **Data sources** table. C1 flags data sources when:
* A connector hasn't synced for more than two days
* A file source hasn't been updated in more than seven days
* A connector errored during the most recent sync
Click the eye icon next to a **Last sync** timestamp to view details about the most recent connector sync or file upload.
Click **Sync now** (for connectors) or **Replace file** (for file sources) to update the data source and ensure your campaign is using up-to-date information.
**Do I have to resolve all data accuracy issues before I can prepare the campaign?**
No. This information is presented for your awareness and to help you ensure that your campaign's data is up to date. Resolving data accuracy warnings before proceeding is strongly recommended, but not required.
### Step 5: Stage the campaign
When you're ready, click **Stage campaign**. Staging a campaign generates the individual access review tasks, but does not launch the campaign. Depending on the size of the campaign, staging it might take several minutes.
**Your campaign is a snapshot of access data as it exists the moment you click this button.** Any access changes or updates to data sources that take place after you prepare the campaign will not be reflected in the campaign.
Review the draft campaign's details. If necessary, you can make changes on the **Configuration** tab, but you cannot alter the campaign's scope or policy once it has been prepared.
### Step 6: Start the campaign
If you've set up the campaign to automatically start, it will launch on the scheduled date. If not (or if you need to start the campaign sooner than the scheduled start date), follow these steps to start the campaign when you're ready:
When you're ready, click **Start campaign**. Select whether C1 should email campaign kickoff notifications to the users who are assigned the access reviews in the campaign.
Click **Start campaign**. Again, depending on the size of the campaign, starting it might take several minutes.
**Done.** Your access review campaign is underway. Check out [Manage active campaigns](/product/admin/manage-campaigns) to learn about campaign reminders, reports, and revoking access denied during the campaign.
## Duplicate a past campaign
Only users with the **Campaign Administrator** or **Super Administrator** [user roles](/product/admin/user-roles) in C1 can create and manage campaigns.
Instead of creating a campaign from scratch, you can save time and effort by duplicating a past campaign and tailoring it to your current needs. Duplicating a campaign is a quick way to reuse a past campaign's settings for a one-off review. If you need to run similar campaigns on a regular schedule, [create a campaign template](/product/admin/campaigns#create-a-campaign-template) instead.
Navigate to **Governance** > **Campaigns**.
Locate and click on the name of the campaign that you want to duplicate.
From the more actions (…) menu, select **Duplicate**.
Review the campaign's details and update the information as necessary.
Follow the instructions above to validate, stage, and start the duplicate campaign.
**Done.** Your duplicated access review campaign is underway.
## Create a campaign template
Only users with the **Campaign Administrator** or **Super Administrator** [user roles](/product/admin/user-roles) in C1 can create and manage campaign templates.
### Step 1: Set up the template
Navigate to **Governance** > **Campaigns**.
Click **New campaign**.
Fill out the form, providing the following information:
* **Name**: The campaign's name, which will be displayed to reviewers and shown in the campaign list view.
* **Description**: The description of what this campaign entails and any directions you want to deliver to reviewers.
* **Campaign type**: Select **Template**, then set the **Campaign duration**, or how long each campaign created from the template will run.
* **Review scope type:** Select how campaigns created from this template will identify what to review:
* **By entitlements**: Review user access to specific entitlements or applications. This is the most common type of campaign.
* **By access conflicts**: Review user access that has triggered a violation in one of your enabled conflict monitors. This is a great option for quickly remediating high-risk access issues identified by your conflict monitors.
* **By inheritance**: Review access to cloud infrastructure apps by selecting resources and role assignments. C1 resolves all access that flows into your selections through the resource hierarchy, including inherited and group-based access. See [Scope an access review campaign by inheritance](/product/admin/campaign-scope-by-inheritance) for details.
* **Owner**: The campaign's owner, who will manage the campaign while it is in progress. You can set more than one campaign owner, just be sure anyone you add has the Campaign Administrator or Super Administrator user role in C1.
* **Review policy**: The campaign's default [review policy](/product/admin/policies). If needed, you'll be able to adjust the policy to be used for the review of individual entitlements later in the campaign creation process.
Click **Continue**. The template is created.
### Step 2: Configure how campaigns created from this template will run
You can set the template to create instances of the campaign on a date in the future or on a recurring schedule. You can also create an on-demand instance of the campaign at any time.
**Want to create a campaign from this template right now?**
On the **Campaigns** tab, click **Create campaign** to create an on-demand draft campaign from the template.
On the new template's **Configuration** tab, review and update the details you've entered so far.
If you want to provide any instructions to reviewers about how to complete access reviews in campaigns created from this template, click **Edit** and enter the instructions in the **Review instructions** field.
The instructions you enter will be displayed to all reviewers at the top of the page where they complete their access reviews. You can format your instructions using Markdown to add emphasis, links, and structure.
If you want all reviewers to receive their campaign tasks in the same format, select a **Default access review view**:
* **By application:** review access to one application at a time
* **By resource:** review access organized by resource, so you can see all access across a resource tree in one place
* **By user:** review one user's access at a time
* **Unstructured:** all the assigned reviews together in one list
If a default view is selected, each reviewer's access reviews will open in that view, but individual reviewers can switch to a different view if desired.
By default, all campaign tasks will be created using the review policy you chose. If instead you want campaign tasks to use the review policies set on the entitlements or apps in the campaign, click **Edit** and click to turn on **Use preferred review policies**.
If this option is enabled, C1 will apply policies using this order of precedence: entitlement, application, campaign.
**Optional.** If you'd like to automatically create draft instances of this campaign, either once on a date in the future or regularly on a set schedule, go to the **Schedule** area of the page and click **Edit**.
Click to turn on **Schedule**.
Choose the date you want a draft instance of this campaign to be created.
Using the **Frequency** selector, choose a frequency option to automatically create recurring instances of the campaign, beginning on the date you chose and recurring at the frequency you set.
Choose **None** if you only want to create a single scheduled instance of the campaign on the date you chose.
New campaign drafts will be created on the scheduled dates, at around 8:30 AM Pacific time. The template's owners will be notified by email that a new draft campaign has been set up.
By default, campaigns created from this template are started and ended manually. If you want to automatically start or end campaigns created from this template, configure these settings:
* To automatically start each campaign, click to turn on **Automatically start campaign**. Campaigns will auto-start two days after they are created from this template.
* If the campaign is set to automatically start, choose whether to proceed with auto-start if there are unresolved campaign data accuracy issues. Campaign owners will be notified of any data accuracy issues when they are discovered.
* To automatically end each campaign on the scheduled end date calculated from the campaign duration you set, click to turn on **Automatically end campaign**.
* If the campaign is set to automatically end, choose whether incomplete reviews will be revoked or skipped when the campaign ends.
In the **Notifications and reporting** section, configure whether to automatically send out notifications about the campaigns generated from this template:
* Notify all reviewers with assigned review tasks when a campaign begins
* Notify all campaign owners and reviewers when a campaign ends
* When a campaign is complete, generate a campaign report and notify all campaign owners when it's ready for download
If you do not pre-configure these options here, you'll have another chance to send out notifications and generate a report when ending the campaign.
If you want to use a Slack channel for communication about this campaign, click **Add Slack channel**. Enter a Slack channel name, either an existing channel in your workspace or the name for a new channel you want to create.
When a new campaign made from this template starts, all campaign owners and users assigned access reviews will be automatically added to this channel.
When new campaign instances are created from this template, you'll have a chance to change the Slack channel before starting the campaign.
**Sending campaign notifications to a private Slack channel?** Make sure the [C1 app for Slack](/product/admin/integration-for-Slack) is added to the channel before you configure it here, or the notifications won't be delivered.
**Optional.** To surface app user profile attributes to reviewers during access reviews, find the **Attribute visibility** section and click **+ Add attribute**. For each attribute you want to show, select an app and the attribute key — for example, **department** on AWS PROD. Each app-attribute combination is configured as a separate entry. Reviewers see no attributes by default; only those you configure here will be visible.
See [Map user attributes](/product/admin/attributes) to learn how attributes are defined in C1.
### Step 3: Choose what to review
Next, build a list of the resources that campaigns made from this template will review.
On the **Scope** tab of your template, find the **Apps and entitlements** section of the page and click **Make selections**.
* To run a UAR on user access to specific permissions, click **Review specific resources** and select resources, then click **Save**.
When selecting specific resources, you can use the filter bar to narrow results by **Application**, **Resource type**, **Risk level**, and **Compliance framework**. Select one or more values for any filter to find matching entitlements. Filters use **OR** logic within a single filter type and **AND** logic across filter types. For example, selecting risk levels "High" and "Critical" along with compliance framework "SOX" returns entitlements that are (High OR Critical) AND (SOX).
**OR**
* To run a UAR on user access to applications, click **Review application access** and select apps, then click **Save**.
**OR**
* To run a UAR on all of the resources of a given resource type within a specific app (such as all the groups within Google Workspace), click **Review resources by type** and select the resource types for each applicable application, then click **Save**.
**OR**
* To run a UAR on all entitlements that match a certain risk level or compliance framework, click **By criteria** and select the relevant risk levels and compliance frameworks, then click **Save**. The campaign will include all entitlements that match the criteria you select when you prepare the campaign.
**You cannot mix selections from the four tabs in a single campaign.** If you want to review both application access and non-access resources in a single campaign, select **Review specific resources** or **Review resources by type** and add the **Credential** resource type to the campaign.
**Don't see risk level or compliance framework values in the filter dropdowns?** You must first create attribute values in **Settings** > **Tags** and assign them to entitlements. See [Setting entitlement attributes](/product/admin/managing-entitlements#setting-entitlement-attributes) for details.
If you're building a UAR reviewing specific resources, click the pencil icon to update the policy used to review specific entitlements, or the trashcan icon to remove an entitlement from the review.
**Optional.** Find the **User selection** section of the page and click **Make selections**.
If you don't make any selections here, all users with access to the apps or resources you selected above will be added to the campaign. If you want to narrow the focus of the UAR:
* Click **Select specific users** to build a list of users whose access will be reviewed, then click **Save**.
**OR**
* Click **Select users by criteria** to review users who match the criteria you set, then click **Save**.
You can mix and match these options:
* User status in C1
* Direct reports of a manager
* [User profile attributes](/product/admin/attributes). For example, to run an access review campaign on all the AcmeApp users in your company with the job title "Engineer", create the parameter **User AcmeJob is Engineer**.
**Optional.** Find the **Account parameters** section of the page and click **Make selections**.
If you don't make any selections here, all accounts with access to the apps or resources you selected above will be added to the campaign. If you want to narrow the focus of the UAR:
* Click **Select accounts by criteria** to review app accounts that match the criteria you set, then click **Save**.
You can mix and match these options:
* No account owner
* Account status
* Account type
* Account domain (specifically, whether the email address associated with the account has been [marked trusted](/product/admin/global-settings#set-trusted-domains) by a C1 admin at your organization)
**Optional.** Find the **Grant parameters** section of the page and click **Make selections**.
If you don't make any selections here, all access grants of the apps or resources you selected above will be added to the campaign. If you want to narrow the focus of the UAR:
* Click **Select grants by criteria** to review only the access grants that match the criteria you set, then click **Save**.
You can mix and match these options:
* New grants added within the time period you select or between two specific dates
* Temporary (time-limited) or permanent grants
* Grants that have not been used in the time period you select (this information is not available for all applications)
* Direct grants (permissions assigned directly to users) or inherited grants (permissions assigned to a group or role, which are "inherited" by users assigned to that group or role)
* Grants sourced from access profiles (check the box to exclude these grants from your campaign)
A summary of your choices is shown on the **Scope** tab. Click **Validate scope** at any time to generate a report showing a preview of a campaign made from the template based on the current scope.
Once you're satisfied with your selections, move on to the next step.
#### Dynamic scope re-evaluation for tag-filtered templates
When you use risk level or compliance framework filters to select entitlements for a campaign template, C1 saves the **filter criteria** rather than a fixed list of entitlements. Each time a campaign is created from the template and prepared, the system re-evaluates the tag criteria against the current state of your entitlements. This means:
* Entitlements that have been tagged since the template was last configured are **automatically included** in the next campaign.
* Entitlements that have had tags removed are **automatically excluded**.
* You do not need to manually update the template scope when entitlement tags change.
Use **Validate scope** before preparing a campaign to review which entitlements currently match the template's tag criteria and confirm the scope is as expected.
Tag-based scope filtering applies only to [entitlement attribute values](/product/admin/managing-entitlements#setting-entitlement-attributes) (risk level and compliance framework). Custom tags are not supported for campaign scoping.
### Step 4: Review and start a campaign created from a template
When a new campaign is created from the template, it is shown on the template's **Campaigns** tab and also added to the **Drafts** tab.
Edit the campaign as needed, then follow Steps 4 through 6 in [Create a new campaign](/product/admin/campaigns#create-a-new-campaign) to review current data accuracy, stage the campaign, and start the campaign (if necessary).
## Frequently asked questions about creating campaigns
In short, nothing. If you select a resource for your campaign that does not have any grants on any of its entitlements, no review tasks will be created for the resource, as there is nothing to review. You can add these resources to your campaign without impact, or leave them out: it's up to you.
Yes, you can! Go to the running campaign's **Configuration** tab and add or edit the campaign instructions. Reviewers will see the new version of the instructions as soon as you click **Save**.
If your campaign template scope is filtered by risk level or compliance framework, newly tagged entitlements are automatically included the next time a campaign is created from the template and prepared. C1 saves the tag criteria, not a static list, so the scope is re-evaluated against current entitlement tags at each campaign preparation.
Tag-based filtering is used to narrow the list of entitlements shown when selecting specific resources. You select entitlements from the filtered results, and for campaign templates, the filter criteria are saved for dynamic re-evaluation. You cannot mix manually selected individual entitlements with a purely tag-driven dynamic scope in the same campaign.
You can filter entitlements by **risk level** and **compliance framework** — these are the built-in entitlement attribute types in C1. To use these filters, first create attribute values in **Settings** > **Tags** and assign them to your entitlements. See [Setting entitlement attributes](/product/admin/managing-entitlements#setting-entitlement-attributes) for setup instructions.
No. The scope type you choose when creating a campaign cannot be changed afterward. If you need a different scope type, create a new campaign.
If you scope a campaign by **All** conflict monitors, the campaign includes all violations from every enabled monitor at the time the campaign is prepared. Monitors enabled after the campaign is prepared are not included. To include new monitors, create a new campaign.