> ## Documentation Index
> Fetch the complete documentation index at: https://www.c1.ai/docs/llms.txt
> Use this file to discover all available pages before exploring further.
# Create automations
> Automations are custom workflows that can streamline repetitive tasks like onboarding and offboarding, ensuring consistency and reducing manual effort.
Automations in C1 empower you to build custom workflows for repetitive tasks, significantly streamlining your operational processes. Automations are ideal for kicking off critical processes when an employee's status changes, providing seamless onboarding, secure offboarding, efficient role transfers, and timely access reviews. Automations ensure consistency, reduce manual effort, and improve compliance.
Find and manage all your automations on the **Automations** page.
## Automation structure
Here's a sample automation's details page:
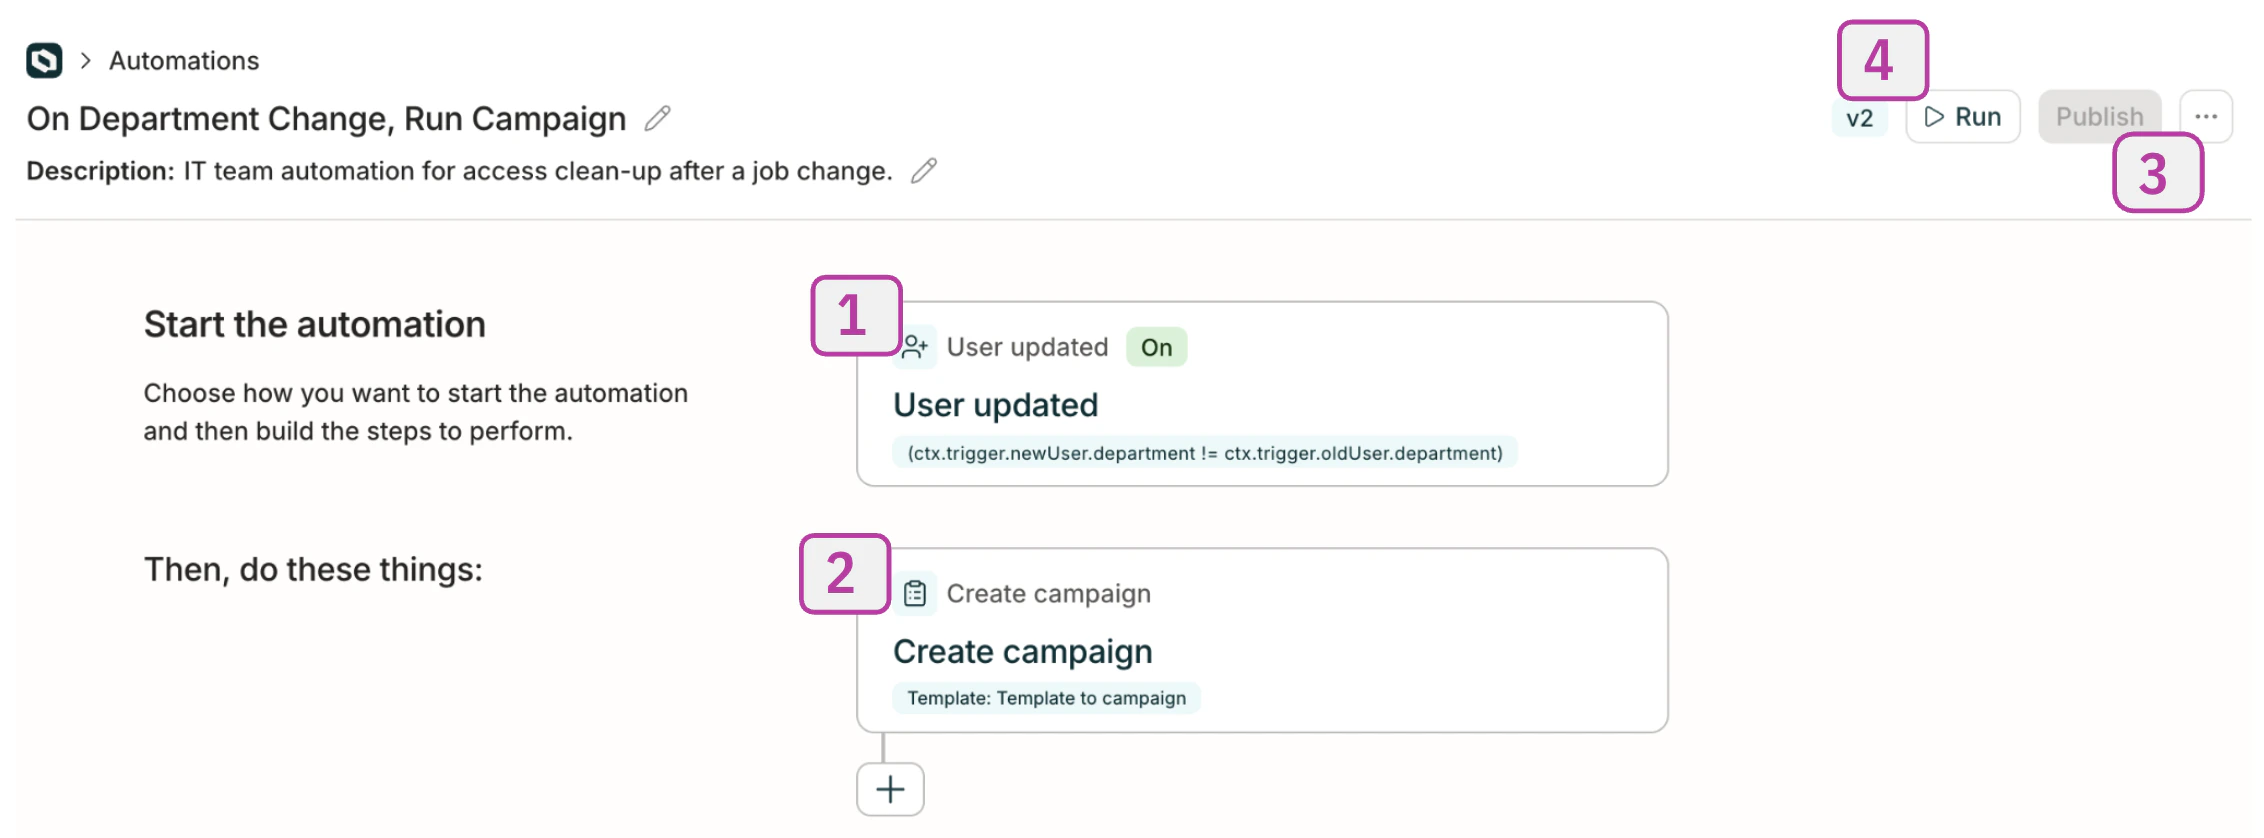 Let's break down the structure:
1. **Automation trigger**: This determines what causes an automation to run. This automation's trigger is turned on, so it will run automatically. You can also manually start an automation run at any time by clicking **Run** at the top of the page.
2. **Automation steps**: These are the actions your automation performs. This automation has only one step, but you can add as many as you need.
3. **Publication status**: Each automation is in either a **draft** or **published** state. Here, the **Publish** button is greyed out to indicate that this automation is published.
4. **Version number**: Automations are versioned (this one is **v2**), and you can restore a previous version of an automation if necessary.
## Create a new automation
A user with the **Super Admin** role in C1 must complete this task.
Navigate to **Admin** > **Automations** and click **New automation**.
Give your automation a name and add a description, if desired.
Click **Set automation trigger** and choose the event that will trigger this automation. Refer to the [automation triggers reference](/product/admin/automations-triggers-reference) for details on the available triggers.
Set the **Automation** toggle to **On** if you want to start triggering the automation when the event you've selected occurs as soon as the automation is published. You can also leave the toggle off for now, if desired.
Automations in their draft state do not run automatically, even if this toggle is enabled.
Click **Add step** and select the first step for the automation. Refer to the [automation steps reference](/product/admin/automations-steps-reference) for details on the available automation steps.
Fill out the automation step form and click **Save**.
Click **+ Add step** again and repeat the process to add additional steps, as needed.
If you need to reorder the automation steps, hover over the step and use the arrow keys.
To delete a step entirely, hover over the step and click the trash can icon.
To test your automation, click **Run draft** at the top of the page.
You'll be asked to provide context for the test run, and will see a panel showing the details of the execution as it proceeds.
When you're ready, click **Publish** to put the automation into use.
Make sure to check on the status of the automation trigger, and turn it to **On** if you want to start triggering the automation when the event you've selected occurs.
**Done.** The automation is now ready for use. To see all executions of this automation, click the **...** (more actions) menu and select **Show execution history**. To see runs across all automations in one place, use the **Executions** tab on the **Automations** page.
### Fine-tuning your automation
On the **Advanced** tab of each automation step’s setup drawer, you can add a CEL expression that instructs the automation to skip the step if a condition is met. This section also displays the step’s **Step ID**, which is used to reference the current step’s output in later steps.
On the **Available data** tab, you’ll find data gathered from previous steps in the automations, which can be used to write CEL expressions to refine or define conditions in later steps.
See [workflow expressions](/product/admin/expressions-workflows) for the full CEL syntax available in automations, including the `ctx` object, `{{ }}` template syntax, and how to reference trigger data and step outputs.
### Editing an automation
When first published, new automations are marked **v1**. If you make edits to the automation, it will create a new draft version of the automation, which you can test and publish (as **v2**) when you're ready.
To see all versions of the automation, click the **...** (more actions) menu and select **Show version history**. You can restore a different version of the automation from this list.
Publishing a new version does not interrupt executions already in progress. Running executions complete using the version they started with.
## View execution history
The **Executions** tab on the **Automations** page shows a combined log of all automation runs across your organization. Use it to monitor activity, troubleshoot failures, and spot patterns without navigating to individual automations.
You can filter the list by automation, status, and app. Click any execution to see step-by-step details for that run.
To view execution history for a single automation, click the **...** (more actions) menu on the automation and select **Show execution history**.
To protect against automations that run unexpectedly at high volume, you can set a rate limit using the [circuit breaker](/product/admin/automation-circuit-breaker). When the limit is exceeded, C1 pauses the automation and queues new trigger events for review rather than running them.
## Get agent help building automations
**This agent is in early access.** This means it's undergoing ongoing testing and development while we gather feedback, validate functionality, and improve outputs. Please contact our Support team with any issues or feedback.
The Automation assistant is an AI-powered agent that creates automations for you based on your prompts. Describe the workflow you want to automate, and the agent translates your prompt into a series of automation steps, complete with the appropriate trigger and actions. This makes building automations faster, especially for complex workflows that would otherwise require careful manual setup.
On the **Automations** page, click **Create with Automation assistant** to get started.
Let's break down the structure:
1. **Automation trigger**: This determines what causes an automation to run. This automation's trigger is turned on, so it will run automatically. You can also manually start an automation run at any time by clicking **Run** at the top of the page.
2. **Automation steps**: These are the actions your automation performs. This automation has only one step, but you can add as many as you need.
3. **Publication status**: Each automation is in either a **draft** or **published** state. Here, the **Publish** button is greyed out to indicate that this automation is published.
4. **Version number**: Automations are versioned (this one is **v2**), and you can restore a previous version of an automation if necessary.
## Create a new automation
A user with the **Super Admin** role in C1 must complete this task.
Navigate to **Admin** > **Automations** and click **New automation**.
Give your automation a name and add a description, if desired.
Click **Set automation trigger** and choose the event that will trigger this automation. Refer to the [automation triggers reference](/product/admin/automations-triggers-reference) for details on the available triggers.
Set the **Automation** toggle to **On** if you want to start triggering the automation when the event you've selected occurs as soon as the automation is published. You can also leave the toggle off for now, if desired.
Automations in their draft state do not run automatically, even if this toggle is enabled.
Click **Add step** and select the first step for the automation. Refer to the [automation steps reference](/product/admin/automations-steps-reference) for details on the available automation steps.
Fill out the automation step form and click **Save**.
Click **+ Add step** again and repeat the process to add additional steps, as needed.
If you need to reorder the automation steps, hover over the step and use the arrow keys.
To delete a step entirely, hover over the step and click the trash can icon.
To test your automation, click **Run draft** at the top of the page.
You'll be asked to provide context for the test run, and will see a panel showing the details of the execution as it proceeds.
When you're ready, click **Publish** to put the automation into use.
Make sure to check on the status of the automation trigger, and turn it to **On** if you want to start triggering the automation when the event you've selected occurs.
**Done.** The automation is now ready for use. To see all executions of this automation, click the **...** (more actions) menu and select **Show execution history**. To see runs across all automations in one place, use the **Executions** tab on the **Automations** page.
### Fine-tuning your automation
On the **Advanced** tab of each automation step’s setup drawer, you can add a CEL expression that instructs the automation to skip the step if a condition is met. This section also displays the step’s **Step ID**, which is used to reference the current step’s output in later steps.
On the **Available data** tab, you’ll find data gathered from previous steps in the automations, which can be used to write CEL expressions to refine or define conditions in later steps.
See [workflow expressions](/product/admin/expressions-workflows) for the full CEL syntax available in automations, including the `ctx` object, `{{ }}` template syntax, and how to reference trigger data and step outputs.
### Editing an automation
When first published, new automations are marked **v1**. If you make edits to the automation, it will create a new draft version of the automation, which you can test and publish (as **v2**) when you're ready.
To see all versions of the automation, click the **...** (more actions) menu and select **Show version history**. You can restore a different version of the automation from this list.
Publishing a new version does not interrupt executions already in progress. Running executions complete using the version they started with.
## View execution history
The **Executions** tab on the **Automations** page shows a combined log of all automation runs across your organization. Use it to monitor activity, troubleshoot failures, and spot patterns without navigating to individual automations.
You can filter the list by automation, status, and app. Click any execution to see step-by-step details for that run.
To view execution history for a single automation, click the **...** (more actions) menu on the automation and select **Show execution history**.
To protect against automations that run unexpectedly at high volume, you can set a rate limit using the [circuit breaker](/product/admin/automation-circuit-breaker). When the limit is exceeded, C1 pauses the automation and queues new trigger events for review rather than running them.
## Get agent help building automations
**This agent is in early access.** This means it's undergoing ongoing testing and development while we gather feedback, validate functionality, and improve outputs. Please contact our Support team with any issues or feedback.
The Automation assistant is an AI-powered agent that creates automations for you based on your prompts. Describe the workflow you want to automate, and the agent translates your prompt into a series of automation steps, complete with the appropriate trigger and actions. This makes building automations faster, especially for complex workflows that would otherwise require careful manual setup.
On the **Automations** page, click **Create with Automation assistant** to get started.
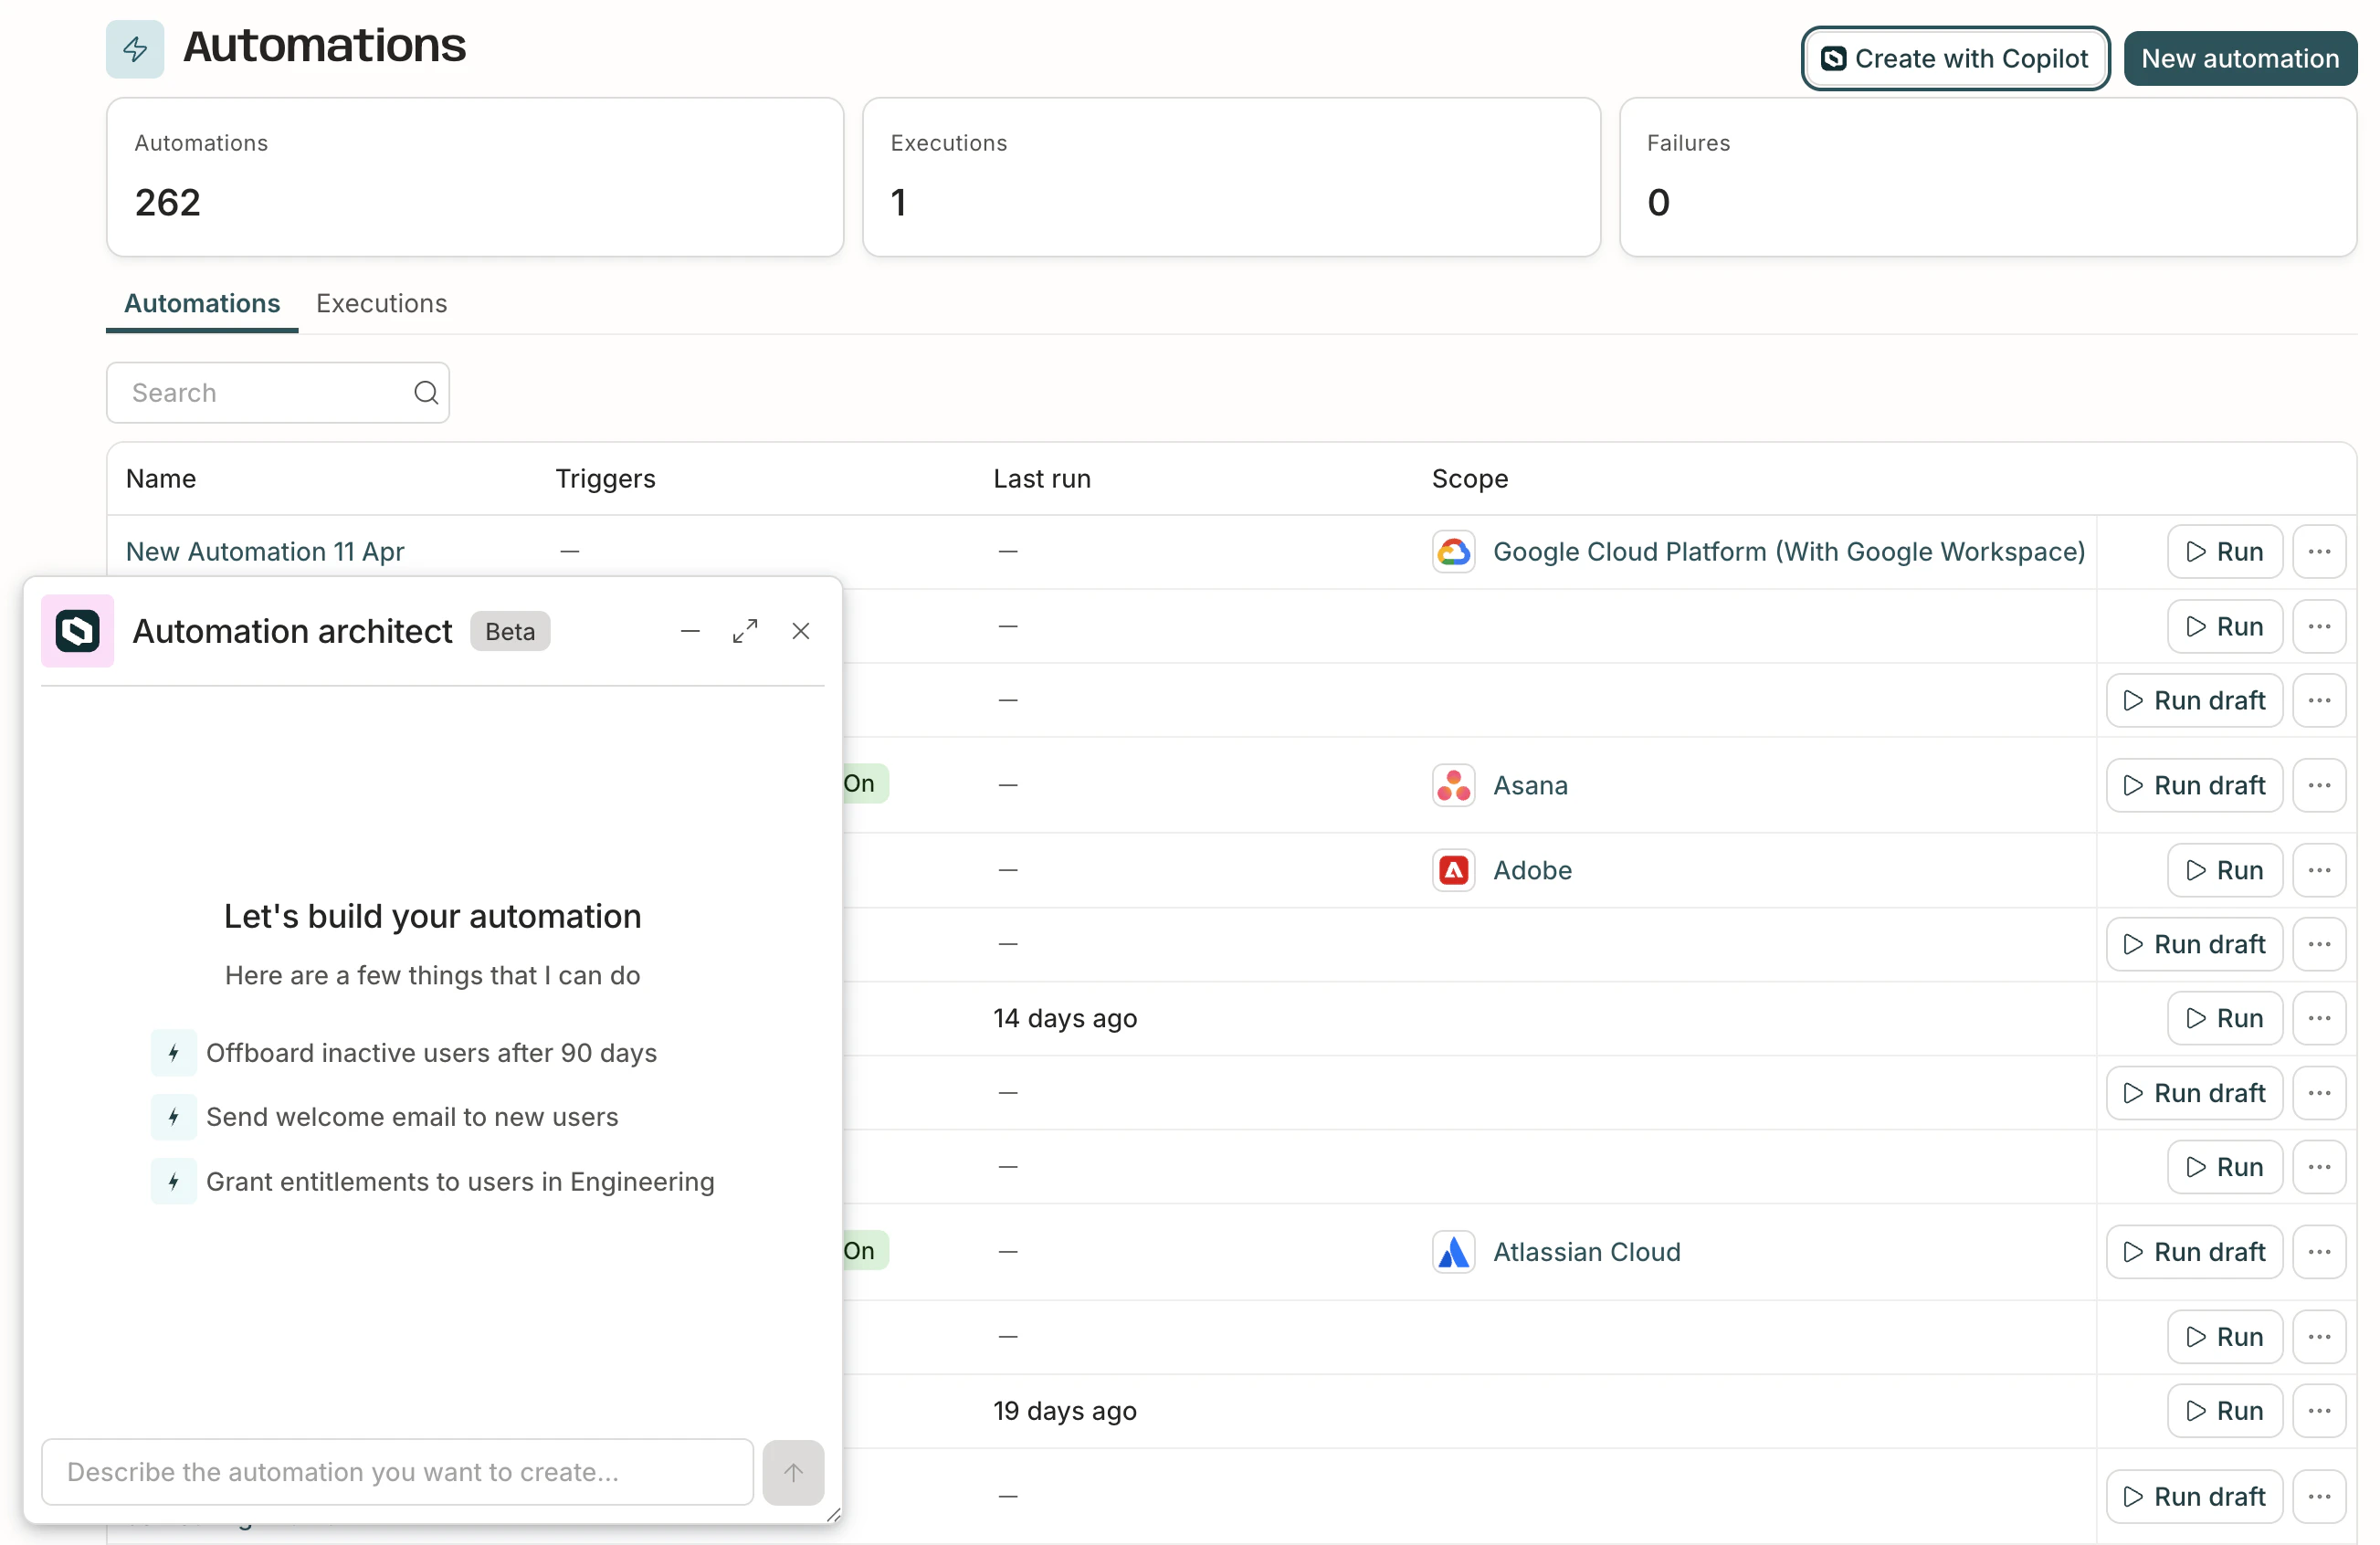 Once the agent generates your automation, you can review, modify, test, and publish it like any manually created automation.
The agent currently focuses on creating new automations. Editing capabilities for existing automations are coming soon.
## App-specific automations
A user who is an application owner with the **App Admin** role can create and manage app-specific automations for the apps they own.
You can create and manage automations that are scoped to a specific app on that application's **Automations** tab.
Use app-scoped automations when the workflow only applies to a single application, such as cleaning up unused access in Salesforce or provisioning accounts in a department-specific tool.
To create an app-specific automation:
Navigate to **Admin** > **Applications** and click the name of an application you own.
Click **Automations**. Any existing app-specific automations are listed here.
Click **New automation**, then follow the steps in [Create a new automation](/product/admin/automations#create-a-new-automation).
All app-specific automations are also listed on the **Automations** page. Only users with the **Super Admin** role can see and manage these automations from this page.
### Unused access automations
**Availability and functionality of unused access automations**
Some older connectors do not support the data needed to run unused access automations. The **Unused access** section is not displayed on these apps' details pages.
Be aware that while the **Unused access** section is displayed on all current-generation connectors' app pages, **only those connectors that report last login data** (and their child apps, as relevant) can correctly track login data and use it to strategically take action on unused accounts via an unused access automation. View the [list of connectors that report last login information](/baton/capabilities) on the connector capabilities table.
**CAUTION: If an unused access automation is set up on an app whose connector does not report last login information, the automation will take action on all app accounts.**
Unused access automations are tailored to help you manage unused app access. These automations fire when a user has not logged into their app account for the length of time you specify.
Create and manage unused access automations in the **Unused access** section of the app's **Overview** page. This section shows the number of accounts that have not been accessed in the past 30 days (click through to see the full list of these accounts on the **Access explorer** page), and is the home of controls for quickly creating an automation for unused access.
Once the agent generates your automation, you can review, modify, test, and publish it like any manually created automation.
The agent currently focuses on creating new automations. Editing capabilities for existing automations are coming soon.
## App-specific automations
A user who is an application owner with the **App Admin** role can create and manage app-specific automations for the apps they own.
You can create and manage automations that are scoped to a specific app on that application's **Automations** tab.
Use app-scoped automations when the workflow only applies to a single application, such as cleaning up unused access in Salesforce or provisioning accounts in a department-specific tool.
To create an app-specific automation:
Navigate to **Admin** > **Applications** and click the name of an application you own.
Click **Automations**. Any existing app-specific automations are listed here.
Click **New automation**, then follow the steps in [Create a new automation](/product/admin/automations#create-a-new-automation).
All app-specific automations are also listed on the **Automations** page. Only users with the **Super Admin** role can see and manage these automations from this page.
### Unused access automations
**Availability and functionality of unused access automations**
Some older connectors do not support the data needed to run unused access automations. The **Unused access** section is not displayed on these apps' details pages.
Be aware that while the **Unused access** section is displayed on all current-generation connectors' app pages, **only those connectors that report last login data** (and their child apps, as relevant) can correctly track login data and use it to strategically take action on unused accounts via an unused access automation. View the [list of connectors that report last login information](/baton/capabilities) on the connector capabilities table.
**CAUTION: If an unused access automation is set up on an app whose connector does not report last login information, the automation will take action on all app accounts.**
Unused access automations are tailored to help you manage unused app access. These automations fire when a user has not logged into their app account for the length of time you specify.
Create and manage unused access automations in the **Unused access** section of the app's **Overview** page. This section shows the number of accounts that have not been accessed in the past 30 days (click through to see the full list of these accounts on the **Access explorer** page), and is the home of controls for quickly creating an automation for unused access.
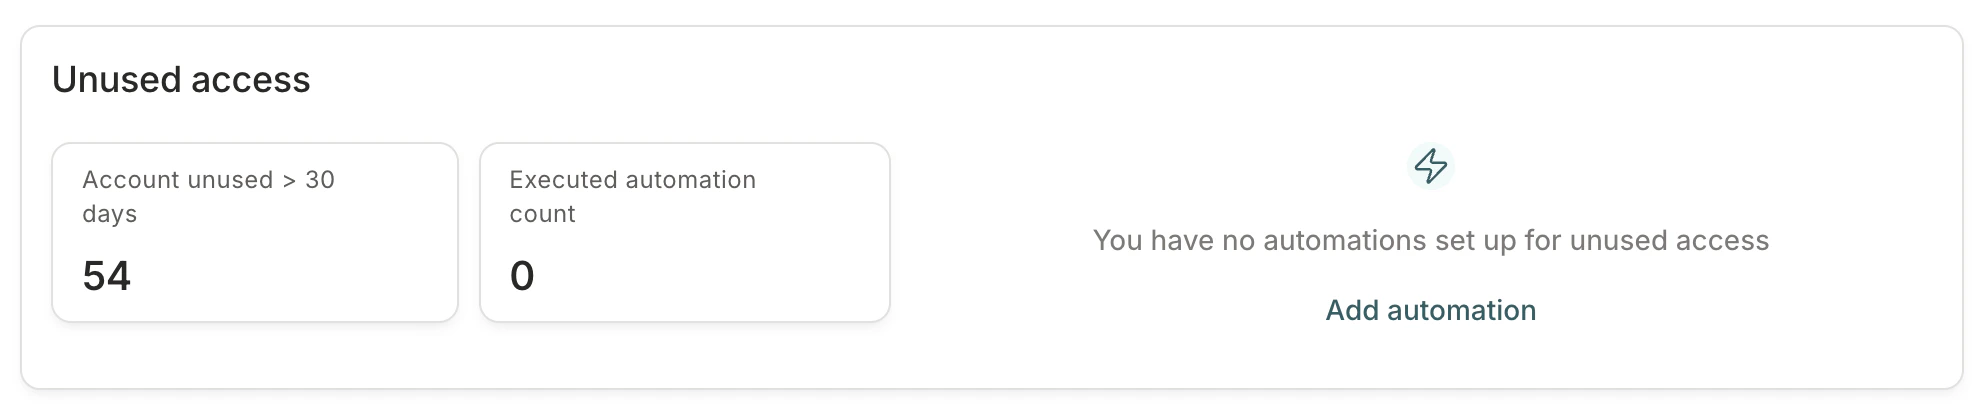 To set up a new unused access automation:
Locate the **Unused access** section of the app's **Overview** page and click **Add automation**.
Choose from the list of automation templates:
* Send a notification after 30 days
* Revoke access after 45 days
* Create a custom usage-based automation from scratch
The automation draft is set up for you. Click the **Unused access** trigger, review the details and make any adjustments.
You can choose how to treat accounts with no login activity, set how to perform the initial runs of the automation, and narrow the automation's scope, if desired.
Click **Save**.
If needed, review the automation's steps and add additional steps as desired.
When you're ready, click **Publish**.
The automation is now ready for use. To see all executions of this automation, click the **...** (more actions) menu and select **Show execution history**. To see runs across all automations in one place, use the **Executions** tab on the **Automations** page.
**Done.** You can review and update this automation on the **Unused access** section of the app's **Overview** page (users with the **Super Admin** role can also see it on the **Automations** page). You can also add additional usage-based automations to this app to further fine-tune how unused access is managed.
To set up a new unused access automation:
Locate the **Unused access** section of the app's **Overview** page and click **Add automation**.
Choose from the list of automation templates:
* Send a notification after 30 days
* Revoke access after 45 days
* Create a custom usage-based automation from scratch
The automation draft is set up for you. Click the **Unused access** trigger, review the details and make any adjustments.
You can choose how to treat accounts with no login activity, set how to perform the initial runs of the automation, and narrow the automation's scope, if desired.
Click **Save**.
If needed, review the automation's steps and add additional steps as desired.
When you're ready, click **Publish**.
The automation is now ready for use. To see all executions of this automation, click the **...** (more actions) menu and select **Show execution history**. To see runs across all automations in one place, use the **Executions** tab on the **Automations** page.
**Done.** You can review and update this automation on the **Unused access** section of the app's **Overview** page (users with the **Super Admin** role can also see it on the **Automations** page). You can also add additional usage-based automations to this app to further fine-tune how unused access is managed.
 ## Features related to automations
* **[Requestable automations](/product/admin/automation-actions)**: Let users trigger workflows from the self-service catalog, with approval flows and form inputs.
* **[Functions](/product/admin/functions)**: Extend automations with custom TypeScript logic for use cases that go beyond built-in steps. See [using Functions in automations](/product/admin/functions-automations).
* **[Workflow expressions](/product/admin/expressions-workflows)**: The `ctx` object, `{{ }}` template syntax, and data flow patterns for CEL in automations.
* **[Triggers reference](/product/admin/automations-triggers-reference)**: Detailed configuration for all 11 trigger types.
* **[Steps reference](/product/admin/automations-steps-reference)**: Detailed configuration for all 15 step types.
* **[Expressions examples](/product/admin/expressions-examples)**: Copy-paste CEL patterns for common scenarios.
* **[Circuit breaker](/product/admin/automation-circuit-breaker)**: Set a rate limit on an automation to pause it automatically if it runs too many times within a set period.
## Features related to automations
* **[Requestable automations](/product/admin/automation-actions)**: Let users trigger workflows from the self-service catalog, with approval flows and form inputs.
* **[Functions](/product/admin/functions)**: Extend automations with custom TypeScript logic for use cases that go beyond built-in steps. See [using Functions in automations](/product/admin/functions-automations).
* **[Workflow expressions](/product/admin/expressions-workflows)**: The `ctx` object, `{{ }}` template syntax, and data flow patterns for CEL in automations.
* **[Triggers reference](/product/admin/automations-triggers-reference)**: Detailed configuration for all 11 trigger types.
* **[Steps reference](/product/admin/automations-steps-reference)**: Detailed configuration for all 15 step types.
* **[Expressions examples](/product/admin/expressions-examples)**: Copy-paste CEL patterns for common scenarios.
* **[Circuit breaker](/product/admin/automation-circuit-breaker)**: Set a rate limit on an automation to pause it automatically if it runs too many times within a set period.