> ## Documentation Index
> Fetch the complete documentation index at: https://www.c1.ai/docs/llms.txt
> Use this file to discover all available pages before exploring further.
# Configure requestable automations
> Requestable automations let you safely expose powerful automations to business users and agents without giving them standing admin access.
## What are requestable automations?
A requestable automation is a [C1 automation](/product/admin/automations) that you make requestable to end users. Unlike standard automations that are triggered by schedules or events, requestable automations are user-driven workflows, such as creating a new GitHub repo or requesting replacement hardware. Requestable automations maintain strict governance while removing IT as a manual bottleneck for repetitive workflows.
### How do requestable automations work?
The lifecycle of a requestable automation connects automated workflows with human governance:
1. **Automation design:** Start by building an automation. By marking it as requestable, you convert a back-end process into an on-demand service.
2. **Configuration and scoping:** You define audience-scoped access to control who can see the action, and attach custom request forms to collect required information (like a "project ID") up front to eliminate manual follow-up.
3. **Governance gate:** Every request is governed by a policy-driven approval. The automation pauses for human review or auto-approves based on your risk logic, providing a consistent control layer across systems.
4. **Execution and logging:** Once approved, C1 runs the steps using the requester's form inputs. Every action, from the request to the final step, is captured in an end-to-end audit log.
## Create a requestable automation
A user with the **Super Admin** role in C1 must complete this task.
### Plan the use case
Before you configure anything, clarify:
* **Outcome**: What real-world operation are you trying to enable? (Examples: "Allow shift workers to log timecard punch-ins" or "Allow employees to request a new laptop".)
* **Risk level**: Is this high-risk (for example, production access), medium, or low (for example, a basic device request)?
* **Audience**: Who should be able to request this? Everyone? A specific team? Only app owners?
* **Approvers**: Who should be in the approval path, if an approval path is needed?
### Build or select the automation
Go to **Workflows** > **Automations**.
Follow the docs to [set up a new automation](/product/admin/automations#create-a-new-automation) or select an existing one.
Ensure the automation performs the desired steps to achieve the intended outcome.
Click **Publish**.
**Requestable or scheduled/triggered?** A single automation cannot be both cron/event-triggered and requestable. If you need both options, duplicate the automation, set one to have an automated trigger, and make the other requestable.
### Configure requestability
From the **Automations** page, select the automation.
Ensure that the trigger is set to **On demand** (if a different trigger is set, you must delete it).
Click the **...** (more actions) menu at the top right of the page and select **Configure requestable**.
Set a clear **Request display name**.
This is what end users will see in their **Actions** catalog, so choose a clear, action-oriented name (for example, "Request new device" rather than "Device provisioning automation").
### Design the form
If the action should gather information from a requesting user, select an existing form or follow the steps below to create a new one.
In the **Request form** section, use the dropdown to select **Create new form**.
Give the new form a name and description.
Remember that this form will be available as an option across your C1 installation, so choose a name that will help your colleagues understand the form's purpose.
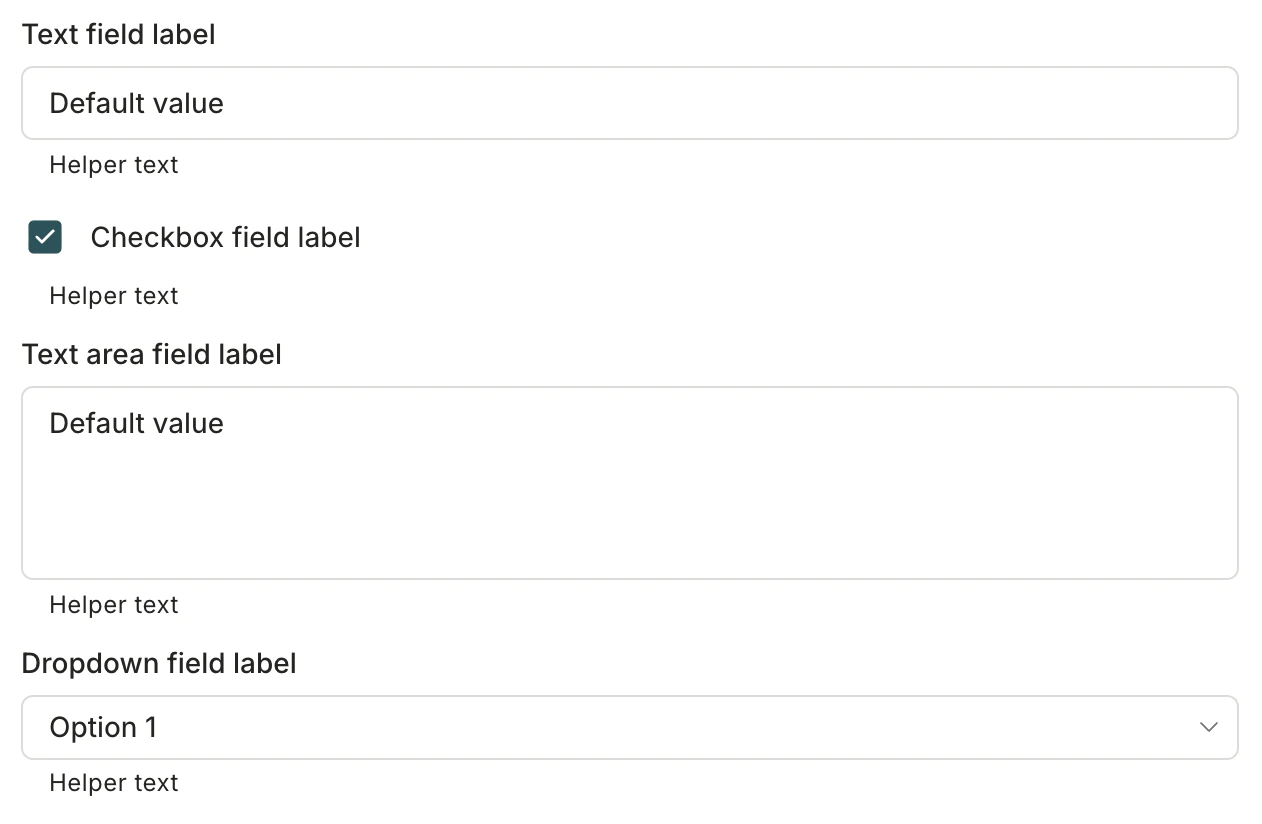
Select the data type for your first field. The current options are:
* Text (a single-line text field)
* Checkbox
* Text area (a multi-line text field)
* Dropdown
Fill in the field label and provide dropdown options, helper text, a default value, and a placeholder, as needed. The required and available elements vary by field type. Here's an overview of where these elements are shown in the form:
 For text and text area fields, choose whether the field is required. A user cannot submit a request if a required field has not been filled out.
As needed, click **Add field** and repeat the steps above to add additional fields.
Avoid collecting data C1 already has. Requester identity (ID, email, name) is always available and does not need to be requested again.
When you're satisfied, click **Save**. Click **Preview** to see how the form will appear to requesters.
#### Mapping form inputs to automation steps
To make your automation dynamic, you can pass the information collected in your form directly into your automation steps. Each field in your form has a Field ID that acts as a variable.
How to use variables:
* Syntax: Click the **Available data** tab of any step in your automation to see and copy the list of available form variables. These are nested under the `trigger` object.
* Usage: You can insert these variables into any supported automation step field, such as the body of a Slack message, a ticket description in Jira, or a resource name in a cloud provider.
* Dynamic logic: Use these inputs to drive conditional branching. For instance, if `Urgency` is "High," you might route the workflow to a different approval policy or a higher-priority queue.
### Configure the request policy
Follow the docs to [set up a new request policy](/product/admin/policies) or select an existing one.
Remember to consider the level of review and approval needed for the action:
* Auto-approve low-risk, reversible operations.
* Require manager or app owner approval for operations that create or change access.
* Consider multi-stage policies for high-risk actions (for example, manager plus security).
### Scope the audience and provide instructions
Define who can **view** and **request** the action. Only the users you set here will be able to see and request the action. Choose from:
* Entire organization (**Everyone**).
* Only users who are currently assigned the specific entitlement or entitlements you specify. Use existing entitlements or groups where possible to align with your current RBAC model.
**Optional.** Provide clear instructions for requesters in the **Request instructions** field. This text appears at the top of the request form to guide users on when and how to use the action.
Click **Save** to finalize the request configuration.
### Enable the requestable automation
Finally, when you're ready to make the action available to your defined audience, enable the **Allow users to request** toggle.
**Done.** Your requestable automation is now available to your defined audience in their **Actions** catalog.
### Test end-to-end
Once you have configured your requestable automation, perform a dry run to ensure the governance and automation align with your expectations.
**Test as different roles:** Log in as a user within your defined audience to confirm the action is visible in the catalog, then log in as an approver to verify the task routing and notifications.
**Validate the form and policy:** Ensure the field labels are clear for requesters and that the approval policy correctly gates or auto-approves the request based on your logic.
**Audit the execution:** After approval, verify that the automation steps completed successfully in the downstream system and that the C1 task log accurately captures the inputs and outcomes.
**Check error handling:** Intentionally trigger an error (such as a missing required field or a connector timeout) to ensure the resulting task status and notifications provide enough context for troubleshooting.
## App-specific requestable automations
A user who is an application owner with the **App Admin** role can create and manage app-specific requestable automations for the apps they own.
You can create and manage requestable automations that are scoped to a specific app on that application's **Automations** tab.
To create an app-specific requestable automation:
Navigate to the **Apps** page and click the name of an application you own.
Click **Automations**. Any existing app-specific automations are listed here.
Follow the instructions to create a new [app-specific automation](/product/admin/automations#create-an-app-specific-automation) or select an existing one from the list.
Follow the instructions above, beginning at [Configure requestability](/product/admin/automation-actions#configure-requestability), to configure the automation as requestable, including designing the form, setting the request policy, and scoping the audience.
All app-specific automations are also listed on the **Automations** page. Only users with the **Super Admin** role can see and manage these automations from this page.
## Best practices and examples
Requestable automations are most effective for operations that are currently managed via manual tickets, shared credentials, or ad-hoc scripts. By moving these into C1, you gain reliable audit evidence and empower non-IT staff to perform controlled changes.
### Common patterns
**Just-in-time infrastructure:** On-demand creation of project-scoped groups or repos with approval from an app owner.
**Scoped admin tasks:** Allowing app owners to manage their own application's groups without granting them directory-wide admin rights.
**Non-access workflows:** Handling operational tasks like environment freezes, timecard punch-ins, or hardware requests.
### Example: Hardware request workflow
This example demonstrates how to replace a manual ticketing process with a requestable automation.
**The automation:** A workflow that creates a ticket in your ITSM system (such as Jira or ServiceNow) and notifies an `#it-ops` Slack channel.
**The form:** Collects structured data via a "device type" dropdown and a "reason for request" text field.
**The policy:** Configured to require approval from the user's manager and the IT Lead before the automation executes.
**The outcome:** The user requests a new MacBook Pro via the **Actions** catalog. Once the IT Lead approves the task, the ITSM system ticket is automatically generated and logged, ensuring a consistent audit trail without manual data entry.
For text and text area fields, choose whether the field is required. A user cannot submit a request if a required field has not been filled out.
As needed, click **Add field** and repeat the steps above to add additional fields.
Avoid collecting data C1 already has. Requester identity (ID, email, name) is always available and does not need to be requested again.
When you're satisfied, click **Save**. Click **Preview** to see how the form will appear to requesters.
#### Mapping form inputs to automation steps
To make your automation dynamic, you can pass the information collected in your form directly into your automation steps. Each field in your form has a Field ID that acts as a variable.
How to use variables:
* Syntax: Click the **Available data** tab of any step in your automation to see and copy the list of available form variables. These are nested under the `trigger` object.
* Usage: You can insert these variables into any supported automation step field, such as the body of a Slack message, a ticket description in Jira, or a resource name in a cloud provider.
* Dynamic logic: Use these inputs to drive conditional branching. For instance, if `Urgency` is "High," you might route the workflow to a different approval policy or a higher-priority queue.
### Configure the request policy
Follow the docs to [set up a new request policy](/product/admin/policies) or select an existing one.
Remember to consider the level of review and approval needed for the action:
* Auto-approve low-risk, reversible operations.
* Require manager or app owner approval for operations that create or change access.
* Consider multi-stage policies for high-risk actions (for example, manager plus security).
### Scope the audience and provide instructions
Define who can **view** and **request** the action. Only the users you set here will be able to see and request the action. Choose from:
* Entire organization (**Everyone**).
* Only users who are currently assigned the specific entitlement or entitlements you specify. Use existing entitlements or groups where possible to align with your current RBAC model.
**Optional.** Provide clear instructions for requesters in the **Request instructions** field. This text appears at the top of the request form to guide users on when and how to use the action.
Click **Save** to finalize the request configuration.
### Enable the requestable automation
Finally, when you're ready to make the action available to your defined audience, enable the **Allow users to request** toggle.
**Done.** Your requestable automation is now available to your defined audience in their **Actions** catalog.
### Test end-to-end
Once you have configured your requestable automation, perform a dry run to ensure the governance and automation align with your expectations.
**Test as different roles:** Log in as a user within your defined audience to confirm the action is visible in the catalog, then log in as an approver to verify the task routing and notifications.
**Validate the form and policy:** Ensure the field labels are clear for requesters and that the approval policy correctly gates or auto-approves the request based on your logic.
**Audit the execution:** After approval, verify that the automation steps completed successfully in the downstream system and that the C1 task log accurately captures the inputs and outcomes.
**Check error handling:** Intentionally trigger an error (such as a missing required field or a connector timeout) to ensure the resulting task status and notifications provide enough context for troubleshooting.
## App-specific requestable automations
A user who is an application owner with the **App Admin** role can create and manage app-specific requestable automations for the apps they own.
You can create and manage requestable automations that are scoped to a specific app on that application's **Automations** tab.
To create an app-specific requestable automation:
Navigate to the **Apps** page and click the name of an application you own.
Click **Automations**. Any existing app-specific automations are listed here.
Follow the instructions to create a new [app-specific automation](/product/admin/automations#create-an-app-specific-automation) or select an existing one from the list.
Follow the instructions above, beginning at [Configure requestability](/product/admin/automation-actions#configure-requestability), to configure the automation as requestable, including designing the form, setting the request policy, and scoping the audience.
All app-specific automations are also listed on the **Automations** page. Only users with the **Super Admin** role can see and manage these automations from this page.
## Best practices and examples
Requestable automations are most effective for operations that are currently managed via manual tickets, shared credentials, or ad-hoc scripts. By moving these into C1, you gain reliable audit evidence and empower non-IT staff to perform controlled changes.
### Common patterns
**Just-in-time infrastructure:** On-demand creation of project-scoped groups or repos with approval from an app owner.
**Scoped admin tasks:** Allowing app owners to manage their own application's groups without granting them directory-wide admin rights.
**Non-access workflows:** Handling operational tasks like environment freezes, timecard punch-ins, or hardware requests.
### Example: Hardware request workflow
This example demonstrates how to replace a manual ticketing process with a requestable automation.
**The automation:** A workflow that creates a ticket in your ITSM system (such as Jira or ServiceNow) and notifies an `#it-ops` Slack channel.
**The form:** Collects structured data via a "device type" dropdown and a "reason for request" text field.
**The policy:** Configured to require approval from the user's manager and the IT Lead before the automation executes.
**The outcome:** The user requests a new MacBook Pro via the **Actions** catalog. Once the IT Lead approves the task, the ITSM system ticket is automatically generated and logged, ensuring a consistent audit trail without manual data entry.